Showing posts with label Ravelry. Show all posts

Sunday, October 18, 2020

Christmas Gift Blog Hop - Free Crochet Pattern

 I am so excited to be a part of the Christmas Gift Blog Hop. If you crochet and need some Christmas gift ideas, this blog hop is the perfect opportunity to grab some amazing patterns for free. And they are all projects that can be completed in a few days so you can get those Christmas lists finished.


 I am sharing my Taylor Beanie crochet pattern as a free pdf download. I love textured crochet. Even if the design is simple in construction, textured stitches can add so much detail and beauty. This pattern uses mainly front and back post stitches to create the texture. The pattern includes 3 sizes, Baby, Toddler, and Adult, so you can make it for the whole family!


For this pattern I used worsted weight yarn (Caron Simply Soft) and H and I hooks. I love faux fur poms, so I always add one on top. I made mine in a neutral color, but it looks just as good in a bold color! You can also visit my Ravelry store for even more crochet and knitting patterns. Go to the round up link below for the code to download the pattern for FREE! Offer valid Monday 10/19/2020 only.

I would love to see your Taylor Beanies, so please tag me on Instagram so I can see your beautiful work! Don't forget that there are still more free patterns this month, so go check out the blog hop post that is updated daily with new patterns. You can also sign up to receive notifications of the new patterns daily on the Round Up post.


I hope you enjoy my pattern! Your support of my small business is truly appreciated. 

Happy crocheting!
-Sarah Liz

Tuesday, September 29, 2020

Hannah Blanket Knitting Pattern

I often end up creating new patterns because of custom requests in my Etsy shop. This blanket pattern is an extra special one. A bride wanted a blanket to wrap up in for photos for her winter wedding. Her Grammy is an amazing crocheter, but arthritis made it difficult for her to create something for her granddaughter. They asked me to create something, and the Hannah Blanket pattern was created and named for the bride. 


I have always loved cables, and I ended up using three different cables, and some special cable stitches to create the V pattern. And yes, the texture is just as amazing as it looks!

I used super bulky yarn and size 15 needles, so I was able to finish this blanket in less than a month. And the super bulky yarn just gives all the cozy vibes, perfect for winter. Read on to see more information on purchase of the pattern.


Size 15 (10 mm) US needles, 24 inch or bigger circulars.
Super Bulky Yarn #6 (Bernat Softee Chunky) Approximately 10 Skeins, about 1000 yards
Stitch Markers 
Cable Needle
Scissors
Needle for weaving in ends
Tape Measure – For checking gauge, and length during pattern

Gauge:
Finished blanket measures approximately 34 inches by 60 inches, about a lap blanket size.

I also created a Youtube video on how to knit cables without a cable needle. This pattern has cable stitches in every other row, and I ended up making the whole blanket without using a cable needle in order to make it more quickly. 


I would love to see your Hannah Blankets! Tag me on instagram @craftsbysarahliz so I can see your work!
Thank you for purchasing my pattern. Your support of my small business is truly appreciated!

Permissions
You are free to sell what you make from this pattern. I would appreciate links back to my blog, Ravelry, or Etsy shop to credit me as the designer.
You may not use my photos.
You may not sell this pattern or any part of this pattern, distribute it, or claim it as your own.

© 2020 Sarah Gross - Crafts by Sarah Liz

Saturday, September 26, 2020

Stella Shawl

I created this pattern specifically because I found some amazing hand dyed yarn at Yarnitoli, and I knew I needed to make something special with it. I did not want too much texture, because I wanted the yarn to really shine. But I love cables so much, so I added a cable on one of the sides of the asymmetrical shawl. Then I decided to try out an I-cord bind off for the first time. But with a twist, literally. I added a cable twist to the I-cord bind off, and the result is that the cable running along the side of the shawl, and the cable bind off edge met at the corner point of the shawl. I also added some beads, and suddenly my simple shawl pattern was anything but plain.


You can get the shawl pattern in my shops (links below). Read on to find out more about this pattern.

Instructions include the option for beaded cables, and an I-cord bind off with a cable twist. If you’ve never done these methods before, there are lots of tutorial links included in the pattern, including a video tutorial for an I-cord bind off. Make it using DK or Fingering weight yarn.
Materials:
DK option:
Size 6 (4 mm) US needles, 24 inch or bigger circulars
DK Weight Yarn #3 Approximately 475+ yards
Size 6 beads – optional

Fingering option:
Size 4 (3.5mm) US needles, 24 inch or bigger circulars
Fingering Weight Yarn #1 Approximately 800+ yards
Size 8 beads - optional


I would love to see your Stella shawls! Tag me on instagram @craftsbysarahliz so I can see your work!
Thank you for purchasing my pattern. Your support of my small business is truly appreciated!

Permissions
You are free to sell what you make from this pattern. I would appreciate links back to my blog, Ravelry, or Etsy shop to credit me as the designer.
You may not use my photos.
You may not sell this pattern or any part of this pattern, distribute it, or claim it as your own.

© 2020 Sarah Gross - Crafts by Sarah Liz

Thursday, September 24, 2020

The Taylor Beanie

 One of my goals for 2020 was to be more consistent with pattern designing, and especially to create more crochet patterns. I have released nearly 30 patterns so far this year. And with the Taylor Beanie today, I have now released my 18th crochet pattern this year. I am very excited about this pattern. I love patterns with texture, and this pattern uses front post and back post stitches all throughout the pattern, creating gorgeous texture. 

You can find the patterns in my Ravelry and Etsy shops. And if you want a discount code, I have a VIP group on Facebook that gets all the best deals and coupons, and even some freebies! Keep reading for more info on what to expect with purchase of this pattern.


This pattern comes in 3 sizes Baby (0-6m), Toddler (1-2 years), and Adult.

Materials:

H Hook (5mm)

I Hook (5.5mm) 

Worsted Weight Yarn #4 (Caron Simply Soft) Approximately 100-150 yards

Scissors

Needle for weaving in ends

Optional – Pom pom maker, or furry pom


Abbreviations (US terms):
CH – Chain
Sl St – Slip Stitch
FHDC – Foundation Half Double Crochet
DC – Double Crochet
FPDC – Front Post Double Crochet
BPDC – Back Post Double Crochet
FPDC2tog – Front Post Double Crochet 2 together (decrease)
BPDC2tog – Back Post Double Crochet 2 together (decrease)

FHDC (Foundation Half Double Crochet)

https://www.pinterest.com/pin/459085755770169403/


FPDC and BPDC Tutorial:

https://www.pinterest.com/pin/459085755766469437/


FPDC2tog and BPDC2tog Tutorial: 


I would love to see your Taylor Beanies! Tag me on Instagram  @craftsbysarahliz so I can see your work! Thank you for purchasing my pattern. Your support of my small business is truly appreciated!


*Permissions*

- You are free to sell what you make from this pattern. I would appreciate links back to my blog, Ravelry, or Etsy shop to credit me as the designer.

- You may not use my photos.

- You may not sell this pattern or any part of this pattern, distribute it, or claim it as your own.


© 2020 Sarah Gross - Crafts by Sarah Liz

Wednesday, September 23, 2020

Lil' Pumpkin Hat Knitting

 When fall gets close, everyone goes nuts for pumpkins. Pumpkin Spice, pumpkin decor, and my favorite, pumpkin knitting and crochet projects. I've made quite a few crochet pumpkin beanies, but I wanted to design a knitting pattern for a pumpkin beanie. And since I am obsessed with cables, I could not resist throwing some into the design. This is a good pattern for cable beginners. It is a simple cable, and works up quickly with the thick yarn.

I absolutely love how it turned out! A couple of my test knitters even made the hat in cream, and now I want to as well! This pattern comes in 6 sizes from newborn to adult. Look below for more information on what to expect with purchase of the pattern. 


Materials:

Size 13 (9mm) US needles, 16” circulars and dpn’s (or longer circulars for magic loop)

Size 15 (10 mm) US needles, 16” circulars and dpn’s (or longer circulars for magic loop)

Super Bulky Yarn #6 (Wool Ease Thick & Quick) 1 skein in pumpkin, small amounts of green

Stitch Markers 

Cable Needle

Scissors

Needle for weaving in ends

Tape Measure – For checking gauge, and length during pattern


Tutorials:
Knitting Cables Without a Cable Needle: https://youtu.be/MVWjYoQMZ9E 

 
I would love to see your lil’ pumpkin hats! Tag me on instagram @craftsbysarahliz, so I can see your work! Thank you for purchasing my pattern. Your support of my small business is truly appreciated!

*Permissions*
- You are free to sell what you make from this pattern. I would appreciate links back to my blog, Ravelry, or Etsy shop to credit me as the designer.
- You may not use my photos.
- You may not share this pattern, but please share the listing link so your friends can buy it too.
- You may not sell this pattern, distribute it, or claim it as your own.

© 2020 Sarah Gross - Crafts by Sarah Liz

Tuesday, July 14, 2020

Watermelon Baby Bib

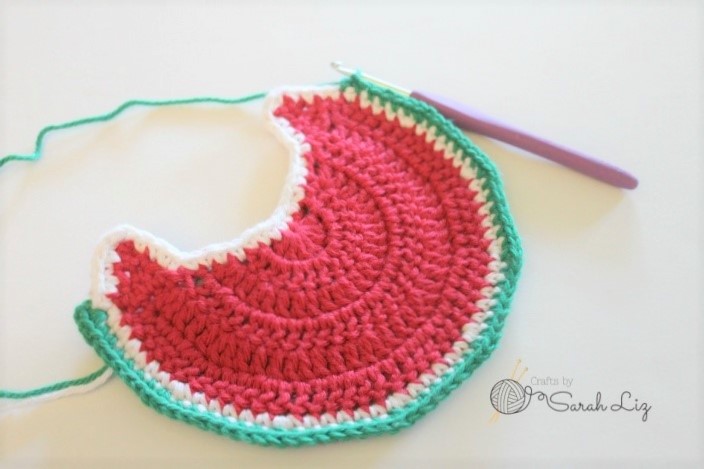
Three years ago I created and released a pattern for this watermelon baby bib. My daughter was proudly modeling it for me, and she definitely needed a drool bib at that age. Up until now it was only available as a paid pdf. But now I have decided to offer for free on my blog! Keep scrolling for instructions and step by step photos so you can make your own watermelon baby bibs!


Size:
Based on the tightness of my tension, the dimensions of the finished bib are approximately 6 inches wide and 4 inches long (not including ties). Feel free to go up or down hook sizes to adjust the size of the bib.


Materials:
G hook (4mm)
Worsted Weight Cotton Yarn (I used Hobby Lobby I Love This Cotton Yarn) in Red, White, Green, and Black.
Large eye needle for weaving in ends

Notes:
Ch 2 does not count as a stitch.

Abbreviations:
Ch - chain
Sc - single crochet
Dc - double crochet
Sl st - slip stitch
Sc decrease – single crochet decrease (single crochet 2 together)
RS – right side
WS – wrong side

Instructions:

Magic Circle

Row 1. 8dc, pull tight (8) RS

Row 2. Ch 2, turn, 2dc in each st across (16) WS
Row 3. Ch 2, turn, *2dc, dc in next*, repeat * * across (24) RS
Row 4. Ch 2, turn, *2dc, dc in next 2*, repeat * * across (32) WS
Row 5. Ch 2, turn, *2dc, dc in next 3*, repeat * * across (40) RS
Row 6. Ch 2, turn, *2dc, dc in next 4*, repeat * * across (48) WS
Cut yarn
Shoulder
Start at outer edge
Row 1. Join yarn with sl st, ch 1, and sc 5 sts evenly along neck edge.

Row 2. Ch 1, turn. Sc decrease, sc, sc decrease
Row 3. Ch 1, turn. Sc, sc Decrease
Row 4. Ch 1, turn. Sc decrease
Cut yarn

Shoulder 2
Turn work around, repeat other side starting on outside edge like the first side.

Now work the bib going all around the edge of the bib.

Change yarn to White
With RS facing, join White at last dc of round 6
Ch 1, *2sc, sc in next 5*, repeat across until you have (56) sts.
Sc along shoulder and neck edges, making sure to do 2sc in top point of shoulder.
When you reach back to the first sc, join with sl st.
  
Change yarn to Green
Join where you joined the white to end the last round.
Ch 1, *2sc, sc in next 6*, repeat across until you have (64) sts.
Sc along shoulder until you get to the top point of shoulder, make bib tie using instructions below.

Bib Tie
Ch 45, sl st in 2nd ch from hook, and sl st in each ch all the way back down to the bib. Continue sc down shoulder, along neckline, and up to the top of the second shoulder. Ch 45, sl st in 2nd ch from hook, and sl st in each ch all the way back down.

Continue sc down shoulder to beginning of round. Sl st to join.

Finishing
Weave in any loose ends. Using black yarn, make small stitches to create the seeds.

I would love to see your Watermelon Bibs! Tag me on Instagram @craftsbysarahliz so I can see your work! Your support of my small business is truly appreciated!


*Permissions*
-You are free to sell what you make from this pattern. I would appreciate links back to my blog, Ravelry, or Etsy shop to credit me as the designer. 
-You may not use my photos.
-You may not sell this pattern or any part of this pattern, distribute it, or claim it as your own.

© 2020 Sarah Gross - Crafts by Sarah Liz


Monday, July 6, 2020

Quick Crochet Flower - Free Pattern

Occasionally I will treat myself with some special yarn. Lately I've been loving hand dyed yarn. I got some beautiful yarn from Wearable Personality (go check out her new yarn shop Fashion Fiber Co.) and I made my Helena Cowl pattern. I only had a little bit of yarn left, and I hate to let such pretty yarn go to waste.

I chose to use the remaining yarn to make flowers for my 3 daughters. They love hair pretties, and I had just enough yarn left to make the 3 flowers. I attached 2 of them to hair clips for my older daughters, and attached the last one to a nylon headband for my youngest.

Materials:
Small amounts of yarn (I used worsted weight #4 yarn)
Desired hook size (I used a size H 5mm hook)
Scissors
Needle for weaving in ends
Optional - hair clips or nylon headbands

Abbreviations (US terms):
Sl st - Slip Stitch
CH - Chain
Ch-sp - Chain Space
SC - Single Crochet
HDC - Half Double Crochet
St(s) - Stitch(es)

Notes:
This flower is worked in the round.
Repeat sections will be noted with * *
Magic Ring Tutorial

Instructions
Make Magic Ring

1. *SC in ring. CH 3.* Repeat * * until you have 5 SC. CH 3, sl st to first SC to join. Pull ring tight to close. (you should have 6 Ch 3-sp)


2. Sl st into 1st ch 3-sp. *CH 1, 3HDC in ch 3-sp. CH 1. Sl st into same ch 3-sp. Sl st into next ch 3-sp.* Repeat * * around, making your final sl st into the first ch 3-sp to join. (6 petals)

3. *Sl st into the ch 1 in the first petal. Make 1 SC in each of the HDCs in the petal. Sl st into the last ch 1 of the same petal. Sl st into the next petal's ch 1.* Repeat * * for each petal. 

Cut yarn. Weave in ends, attaching them to clips or headbands as desired.

I would love to see your crochet flowers! Tag me on Instagram @craftsbysarahliz so I can see your work! Your support of my small business is truly appreciated!
*Permissions*
-You are free to sell what you make from this pattern. I would appreciate links back to my blog, Ravelry, or Etsy shop to credit me as the designer. 
-You may not use my photos.
-You may not sell this pattern or any part of this pattern, distribute it, or claim it as your own.

© 2020 Sarah Gross - Crafts by Sarah Liz

Monday, May 18, 2020

Isla Purse Crochet Pattern

I am so excited to bring you a new pattern today! I collaborated with Clover USA to bring you the Isla Purse crochet pattern. I wanted a purse with some fringe and a long strap for a boho feel.

My daughter has quite a love of purses right now, so I was inspired to make 2 sizes of the purse, with one sized especially for her. She absolutely loves it, and it may just be my favorite thing I've made.

This pattern is extra special because you can find the pattern for FREE on the Clover USA Blog! I also have a premium pdf which has color coded instructions for the 2 sizes. You can purchase the pdf in my Ravelry or Etsy shops.

I would love to see your Isla Purses! Tag me on instagram @craftsbysarahliz so I can see your work! 

Happy Crocheting!
~Sarah Liz

Monday, April 6, 2020

Flower Child Collection - Free Crochet Pattern #3

The third and final pattern in the Flower Child Collection is the original headband pattern that I created. I am sharing it for free for the first time since I published it for sale three years ago. It has been one of my most popular items on my Etsy shop because it works for babies, children, and adults. You can find the written instructions below. You can also find the full photo tutorial in the E-book on my Ravelry.

Photo by Mae Batista Photography
Materials:
C Hook (2.75 mm)
Aunt Lydia’s Crochet Cotton size 10
(I like to use white and yellow)
Scissors
Large eye needle for weaving in ends

Abbreviations:


Ch - chain
Sc - single crochet
Dc - double crochet
Sl st - slip stitch
RS – right side
WS – wrong side

Notes: 
Based on my tension, each flower measures approximately 1 inch. From the 1st flower to the 10th, the headband measures approximately 10 inches, with 10.5 inch ties on either side. By switching up your hook and/or yarn, or even the number of flowers, you can adjust the size of the whole headband.
Instructions:

1.  Ch 70, DO NOT cut the white thread.
2.  Join yellow thread, and ch1. Again, DO NOT cut the white thread.
3.  Sc 6 in last white chain.
4.  Join with sl st to first sc. Cut yellow thread leaving a couple inches for weaving in. Join white thread at the place where you joined the sc’s together.
5.  Ch 2, 3 dc in same st as join. Ch 2, sl st in same st. Sl st into next sc.
6.  Repeat step 5 until you have 6 total petals. Join with sl st to first petal.
7.  Ch 7
8. Repeat steps 2 through 6.
9. Keep repeating steps 2 through 6 with 7 chains in between each flower. After the 10th flower, ch 70 to make the other tie.

Finishing:
Knot the ends of the ties right at the last chain of each tie. I use the yellow ends on each flower to secure down the flowers in place. Weave in the yellow ends. 


Click on these links for the other two patterns in this series:

I would love to see your Flower Child projects! Tag me on Instagram  @craftsbysarahliz so
I can see your work!

I hope you enjoy my pattern. Your support of my small business is truly appreciated!

*Permissions*
- You are free to sell what you make from this pattern. I would appreciate links back to my 
blog, Ravelry, or Etsy shop to credit me as the designer.
- You may not use my photos.
- You may not sell this pattern or any part of this pattern, distribute it, or claim it as your 
own.
© 2020 Sarah Gross - Crafts by Sarah Liz