Showing posts with label Crochet. Show all posts

Thursday, June 12, 2025

Sunset Cup Cozy - Free Pattern

This beginner-friendly cup cozy is a quick make, and by changing up the color combos, you can create something truly unique. I chose a color palette that reminds me of a sunset, hence the name of this pattern. See the pattern below, including some video tutorials for some of the special stitches/techniques.


Materials:
H hook (5mm) - If you have a tighter tension, size up your hook.
Worsted weight yarn #4 (I used I Love This Yarn)
Scissors and needle for weaving in ends

Abbreviations (US terms):
ch - Chain
sc - Single Crochet
hdc - Half Double Crochet
dc - Double Crochet
hdc3rdloop - Half Double Crochet into the 3rd loop (see tutorials)
sl st - Slip Stitch

Tutorials:


Notes
  • Worked in the round
  • The Ch 1 at the beginning of the rounds does NOT count as a st
  • Join each round with a sl st.
  • Repeat sections are noted by * *
  • I changed colors every round starting at round 3

Instructions:

Ch 30, join with sl st to 1st chain to work in the round
  1. Hdc in the back bump of ea ch around. Join with sl st. 
  2. Ch 1, hdc3rdloop into ea st around. Join.
  3. Ch 1, sc in the first st, dc in the next st. *Sc in the next st, dc in the next st.* Repeat around. Join.
  4. Ch 1, dc in the first st, sc in the next st. *Dc in the next st, sc in the next st.* Repeat around. Join
Repeat rounds 3-4 two more times. Repeat row 3 one more time. Continue below.
  1. Ch 1, hdc in ea st around. Join.
  2. Ch 1, hdc3rdloop in ea st around. Join.
Cut yarn, weave in ends. 

Now enjoy your favorite hot beverage on the go!

I would love to see your finished cup cozies! Tag me on socials @sarahlizfiberarts so I can see your work!
Your support of my small business is truly appreciated!

*Permissions*
- You are free to sell what you make from this pattern. I would appreciate links back to my blog, Ravelry, or website to credit me as the designer.
- You may not use my photos.
- You may not share this pattern, or any part of this pattern.
- You may not sell this pattern, distribute it, or claim it as your own.
© 2025 Sarah Gross - Sarah Liz Fiber Arts/Crafts by Sarah Liz


Tuesday, June 10, 2025

Crochet Swatch - Stitch Tutorial

I love playing around with new stitch patterns, so sometimes I just make swatches. Sometimes those swatches make it into designs, and sometimes they just stay swatches. By request, here is one of my favorite swatches that really does need to become a full pattern. Maybe someday it will. For now, it’s just a daydream.

Materials:

H hook

Worsted weight cotton yarn


Instructions:

Chain 30 (multiple of 4 + 2)

  1. Hdc in 2nd ch from hook and in ea of the remaining ch. Turn. 29 sts
  2. Ch 3 (counts as st, or use standing dc), *sk 1 st, v-st in next st, sk 1 st, dc in next st* Repeat to end. Turn. 
  3. Ch 1 (does NOT count as a st), hdc in ea st and ch sp across. Turn.

Repeat rows 2 and 3 until you reach your desired length.


I would love to see if you use this stitch pattern in something! Tag me on socials @sarahlizfiberarts so I can see your work!

*Permissions*
- You are free to sell what you make/design from this stitch tutorial. 
- You may not use my photos.
- You may not sell this blog post, distribute it, or claim it as your own.
© 2025 Sarah Gross - Sarah Liz Fiber Arts/Crafts by Sarah Liz

Wednesday, January 3, 2024

Willow Purse - Free Crochet Pattern

 I wanted a quick and easy design to make purses for my craft shows. But I didn't want it to be too boring. So I came up with this purse design, and you can use the instructions below to make your own! It comes in two different sizes.

Materials:
H Hook (5mm)
Worsted Weight Cotton Yarn
Scissors
Optional - D rings

Instructions:

Ch 31 (41)

1. Hdc in 2nd ch from hook. Sc in each remaining ch. 30 (40) sts

2. Ch 1, turn. Hdc in each st across. 30 (40) sts

3.-4. Repeat row 2.

5. Ch 1, turn. Hdc in each st across. When you get to the end of the row, rotate your work so you are working into the side, 4 hdc along side. Rotate to work on the bottom (foundation ch row). Hdc across. Rotate again to work on the last side. 4 hdc along side. Join with sl st to first hdc of round. 68 (88) sts

Do NOT turn, we are working in the round now. 

6. Ch 1, hdc in first and each st around. Join.

7. Ch 1, hdc3rdloop in first and each st around. Join.

8. Ch 1, hdc in first st. *ch 1, sk 1 st, hdc in next st.* Repeat around. Ch 1, sk last st. Join to first hdc of round.

9. Ch 1, hdc in each st and ch sp around. Join.

10. Ch 1, hdc3rdloop in first and each st around. Join.

Work 4 (5) rounds of hdc in each st

Repeat rounds 7-14(15) 1 more time. Then continue below:

Repeat round 7

Repeat round 8

Repeat round 9

Ch 1, sc3rdloop in first and each st around. 

Cut yarn, weave in ends. 

Strap
Ch 175
1. Sc in 2nd ch from hook, and in each remaining ch.
2. Ch 1, turn. Dc in each st across.
Ch 1, turn. Sc in each st across.

Sew strap onto bag (or D rings)

Cut many strands of yarn, approximately 22 inches long each. Loop 2 strands of yarn per stitch on the bottom of the purse. Use sharp scissors to trim fringe.

Button loop

Ch 12, sl st to first ch to form a loop. Cut yarn, use ends to sew loop onto purse.

Fringe


I would love to see your work! Tag me on Instagram @craftsbysarahliz so I can see your work.
*Permissions* - You are free to sell what you make from this pattern. I would appreciate links back to my blog, Ravelry, or Etsy shop to credit me as the designer. - You may not use my photos. - You may not sell this pattern, or any part of this pattern, distribute it, or claim it as your own. © 2024 Sarah Gross - Crafts by Sarah Liz

Monday, July 17, 2023

Beach Sarong - Free Crochet Pattern

 I wanted to make a quick beach cover-up/sarong for myself this summer. I whipped up this piece, and wrote down the pattern to share with you all. It's constructed like a triangle shawl, and I added fringe for a fun look. 

This post contains affiliate links. Affiliate links are no extra cost to you. See full affiliate disclosure here.

Materials:

Lion Brand 24/7 Cotton - 4 skeins

K (6.5mm) crochet hook

Scissors

Needle for weaving in ends


Notes:

Ch 3 at the beginning of the row counts as a st. 

When you get to the end of the row, the 3 dc go into the top of the ch 3.


Instructions:

Make magic ring

1. Ch 3 (counts as dc), 2dc, ch 2, 3dc. Pull magic ring tight. Turn

2. Ch 3 (counts as dc), 2dc in same sp as turning ch. Ch 1, sk 1 st, dc in next st. In ch 2 sp, (2dc, ch 2, 2dc). Dc in next st, ch 1, sk 1 st, 3dc in top of ch 3. Turn

3. Ch 3 (counts as dc), 2dc in same sp. *ch 1, sk 1 st, dc in next st.* Repeat to ch 2 sp. In ch 2 sp (2dc, ch 2, 2dc). Dc in next st. *ch 1, sk 1 st, dc in next st.* Repeat to last 2 sts. Ch 1, sk 1 st, 3dc in last st. Turn

4. Repeat row 3

5. Ch 3 (counts as dc), 2dc in same sp. Dc in ea st and ch sp until you reach the center ch 2 sp. In ch 2 sp, (2dc, ch 2, 2dc). Dc in ea st and ch sp until you reach the last st. 3dc in last st. Turn

6. Ch 3 (counts as dc), 2dc in same sp. Ch 1, sk 1 st, sc in next st. *ch 5, sk 2 sts, sc in next st.* Repeat to 1 st before ch 2 sp. Dc in next st. In ch 2 sp, (2dc, ch 2, 2dc). Dc in next st. Sc in next st. *ch 5, sk 2 sts, sc in next st.* Repeat to last 2 sts. Ch 1, sk 1 st, 3dc in last st. Turn

7. Ch 3 (counts as dc), 2dc in same sp. Ch 3, sc in ch 5 sp. *ch 5, sc in next ch 5 sp* Repeat to center. After the sc in the last ch 5 sp on this side, ch 3, dc in the last st before center ch 2 sp. In ch 2 sp, (2dc, ch 2, 2dc). Dc in next st. Ch 3, sc in ch 5 sp. *ch 5, sc in next ch 5 sp* Repeat across this side. After the sc in the last ch 5 sp, ch 3, 3dc in last st. Turn

8. Ch 3 (counts as dc), 2dc in same sp. Ch 1, sk 1 st, sc in next st. *Ch 3, sc in next ch sp* Repeat to 3 sts before center. Ch 3, sk 2 sts, dc in last st before ch 2 sp. In ch 2 sp, (2dc, ch 2, 2dc). Dc in next st. *ch 3, sc in next ch sp* Repeat to end. Sk last ch sp, sc in next st. Ch 1, sk 1 st, 3dc in last st. Turn

9. Ch 3 (counts as dc), 2dc in same sp. Dc in next 2 sts. Dc in ch 1 sp, dc in next st. *3dc in next ch sp, dc in next st.* Repeat to last 2 sts before center. Dc in next 2 sts. In ch 2 sp, (2dc, ch 2, 2dc). Dc in next 3 sts. *3dc in next ch sp, dc in next st.* Repeat across, dc in ch 1 sp, dc in next 2 sts, 3dc in last st. Turn

10. Ch 3 (counts as dc), 2dc in same sp. *Ch 1, sk 1 st, dc in next st.* Repeat to center ch 2 sp. In ch 2 sp, (2dc, ch 2, 2dc). Dc in next st. *ch 1, sk 1 st, dc in next st.* Repeat to last 2 sts. Ch 1, sk 1 st, 3dc in last st. Turn

11. Repeat row 10

12. Repeat row 10


Repeat rows 5-12 until you reach desired size. End with a row 8. Continue to Final Row below.


NOTE: In the repeats, row 6 will be slightly different near the center ch 2. Use the following adjustments:

1st row 6: as written in pattern repeat above.

2nd row 6: sc in final st before ch2 space. Eliminate the dc st before center ch 2 space.

3rd row 6: after last sc, sk 1 st, dc in last st before center ch 2 space.

4th row 6: as written in pattern repeat above.


Final row:

Ch 1, turn. Sc in first 3 sts. Sc in ch 1 sp. *sc in next st. 2 sc in ch 3 sp.* Repeat to center ch 2 space. Sc in each dc before ch 2 sp. In ch 2 sp, (sc, ch 1, sc). Sc in next 3 sts. *2 sc in ch 3 sp, sc in next st.* Repeat to last 3 sts. Sc in each of the last 3 sts. 

Finishing: 

Weave in ends. If adding fringe, cut strands of yarn at 12 inches long. Use 3 strands per ch 3 sp.

I would love to see your work! Tag me on Instagram @craftsbysarahliz so I can see your work. 

*Permissions*

- You are free to sell what you make from this pattern. I would appreciate links back to my blog, Ravelry, or Etsy shop to credit me as the designer.

- You may not use my photos.

- You may not sell this pattern, or any part of this pattern, distribute it, or claim it as your own.


© 2023 Sarah Gross - Crafts by Sarah Liz

Sunday, July 16, 2023

Oceana Ice Cream Pint Cozy - Free Crochet Pattern

 I have one more pattern for the Oceana Cozy Collection. I never knew how much I needed an ice cream cozy until I made one. These cozies keep your hands warm, and protect your ice cream from melting. So practical! They make great teacher gifts, or to add to gift baskets. Scroll below for the pattern!

Oh, and don't forget, you can find the Iced Cup Cozy and Hot Cup Cozy patterns on my blog too!


Materials

H hook (5mm)

Worsted Weight Yarn (I used I Love This Yarn)

Scissors and needle

Tag or Feltie - Optional


Instructions

Make magic ring 

1. Ch 1, 10 hdc in magic circle. Join with sl st to first hdc. 10 sts

2. Ch 1, 2hdc in first and in each st around. Join.  20 sts

3. Ch 1, hdc in first st, 2hdc in next. Rpt around. Join. 30 sts

4. Ch 1, hdc in each st around. Join. 30 sts

5. Ch 1, (sc, 2dc) in first st. *Sk next 2 sts. In next st (sc, 2dc).* Repeat * * around, sk last 2 sts, and join with st st to first sc. 

6. Ch 1, hdc in first 4 sts, 2hdc in next st. *hdc in next 4 sts, 2hdc in next st.* Repeat around. Join. 36 sts

7. Rpt round 5. 36 sts

8. Rpt round 4. 36 sts

9. Rpt round 5.

10. Rpt round 4.

11. Rpt round 5.

12. Rpt round 4.

13. Ch 1, hdc3rdloop in each st around. Join.

14. Rpt round 13.

Cut yarn, weave in ends. Add tag or feltie if desired. Now go get that ice cream out of the freezer and enjoy!


I would love to see your Oceana Cozies! Tag me on Instagram @craftsbysarahliz so I can see your work. #oceanaicecreampintcozy


*Permissions*

- You are free to sell what you make from this pattern. I would appreciate links back to my blog, Ravelry, or Etsy shop to credit me as the designer.

- You may not use my photos.

- You may not sell this pattern, or any part of this pattern, distribute it, or claim it as your own.


© 2023 Sarah Gross - Crafts by Sarah Liz


Friday, July 1, 2022

Oceana Iced Coffee Cup Cozy - Free Pattern

 I wanted to make an Iced Coffee Cup Cozy that worked up quickly, but still had some texture from the stitches. So I designed the Oceana Cup Cozy! This stitch pattern gives me some beach vibes, so I made some cozies with some fun beach felties too. Add your favorite tags or felties, and you have a quick project that's perfect for summer markets.


Materials

H hook (5mm)

Worsted Weight Yarn (I used I Love This Yarn)

Scissors and needle

Tag or Feltie - Optional

Instructions

Make magic ring 

1. Ch 1, 10 hdc in magic circle. Join with sl st to first hdc. 10 sts

2. Ch 1, 2hdc in first and in each st around. Join.  20 sts

3. Ch 1, hdc in first st, 2hdc in next. Rpt around. Join. 30 sts

4. Ch 1, hdc in each st around. Join. 30 sts

5. Ch 1, (sc, 2dc) in first st. *Sk next 2 sts. In next st (sc, 2dc).* Repeat * * around, sk last 2 sts, and join with st st to first sc. 


6.-15. Repeat rounds 4 and 5.


16. Ch 1, hdc in each st around. 

17. Ch 1, hdc3rdloop in each st around. 

18. Rpt round 17.

Cut yarn, weave in ends. Add tag or feltie if desired. Slip onto your iced drink, and you are good to go!

I would love to see your Oceana Cup Cozies! Tag me on Instagram @craftsbysarahliz so I can see your work


*Permissions*

- You are free to sell what you make from this pattern. I would appreciate links back to my blog, Ravelry, or Etsy shop to credit me as the designer.

- You may not use my photos.

- You may not sell this pattern, or any part of this pattern, distribute it, or claim it as your own.


© 2022 Sarah Gross - Crafts by Sarah Liz

Wednesday, June 1, 2022

Lip Balm Holder - Free Pattern


These lip balm holders are one of my most practical items that I make. I created this pattern as a quick make for party favors for an event. But then I started making them for markets and craft shows, and they were so popular! Everyone knows someone who is always loosing their lip balm. I used a soft cotton yarn, and a swivel keychain to quickly add the holder to your purse or backpack. Check out the pattern below so you can make some too!

Materials
E hook 3.5mm (I crochet tightly, so you may need to size up if it doesn't fit your lip balm)
I Love This Cotton Yarn (or similar worsted weight)
Inserts - I ordered these from The Knotty Boss on Etsy.

Make magic ring 
1. 8 hdc in magic ring, sl st to first hdc to join. 8 sts
2. Ch 1, hdc blo in each st around. Join. 8 sts
3. Ch 1, hdc in each st around. Join. 8 sts
4. Rpt round 3
5. Rpt round 3
6. Rpt round 3
7. Rpt round 3
8. Ch 1, sc in each st around. Join
9. Ch 1, sc in first and next st.
10. Ch 1, TURN, sc in first and next st. 
11. Rpt round 10
12. Rpt round 10


Fold flap through swivel ring or key ring, and sew to secure.


I would love to see your lip balm holders! Tag me on Instagram @craftsbysarahliz so I can see your work


*Permissions*

- You are free to sell what you make from this pattern. I would appreciate links back to my blog, Ravelry, or Etsy shop to credit me as the designer.

- You may not use my photos.

- You may not sell this pattern, or any part of this pattern, distribute it, or claim it as your own.


© 2022 Sarah Gross - Crafts by Sarah Liz

Sunday, October 18, 2020

Christmas Gift Blog Hop - Free Crochet Pattern

 I am so excited to be a part of the Christmas Gift Blog Hop. If you crochet and need some Christmas gift ideas, this blog hop is the perfect opportunity to grab some amazing patterns for free. And they are all projects that can be completed in a few days so you can get those Christmas lists finished.


 I am sharing my Taylor Beanie crochet pattern as a free pdf download. I love textured crochet. Even if the design is simple in construction, textured stitches can add so much detail and beauty. This pattern uses mainly front and back post stitches to create the texture. The pattern includes 3 sizes, Baby, Toddler, and Adult, so you can make it for the whole family!


For this pattern I used worsted weight yarn (Caron Simply Soft) and H and I hooks. I love faux fur poms, so I always add one on top. I made mine in a neutral color, but it looks just as good in a bold color! You can also visit my Ravelry store for even more crochet and knitting patterns. Go to the round up link below for the code to download the pattern for FREE! Offer valid Monday 10/19/2020 only.

I would love to see your Taylor Beanies, so please tag me on Instagram so I can see your beautiful work! Don't forget that there are still more free patterns this month, so go check out the blog hop post that is updated daily with new patterns. You can also sign up to receive notifications of the new patterns daily on the Round Up post.


I hope you enjoy my pattern! Your support of my small business is truly appreciated. 

Happy crocheting!
-Sarah Liz

Thursday, September 24, 2020

The Taylor Beanie

 One of my goals for 2020 was to be more consistent with pattern designing, and especially to create more crochet patterns. I have released nearly 30 patterns so far this year. And with the Taylor Beanie today, I have now released my 18th crochet pattern this year. I am very excited about this pattern. I love patterns with texture, and this pattern uses front post and back post stitches all throughout the pattern, creating gorgeous texture. 

You can find the patterns in my Ravelry and Etsy shops. And if you want a discount code, I have a VIP group on Facebook that gets all the best deals and coupons, and even some freebies! Keep reading for more info on what to expect with purchase of this pattern.


This pattern comes in 3 sizes Baby (0-6m), Toddler (1-2 years), and Adult.

Materials:

H Hook (5mm)

I Hook (5.5mm) 

Worsted Weight Yarn #4 (Caron Simply Soft) Approximately 100-150 yards

Scissors

Needle for weaving in ends

Optional – Pom pom maker, or furry pom


Abbreviations (US terms):
CH – Chain
Sl St – Slip Stitch
FHDC – Foundation Half Double Crochet
DC – Double Crochet
FPDC – Front Post Double Crochet
BPDC – Back Post Double Crochet
FPDC2tog – Front Post Double Crochet 2 together (decrease)
BPDC2tog – Back Post Double Crochet 2 together (decrease)

FHDC (Foundation Half Double Crochet)

https://www.pinterest.com/pin/459085755770169403/


FPDC and BPDC Tutorial:

https://www.pinterest.com/pin/459085755766469437/


FPDC2tog and BPDC2tog Tutorial: 


I would love to see your Taylor Beanies! Tag me on Instagram  @craftsbysarahliz so I can see your work! Thank you for purchasing my pattern. Your support of my small business is truly appreciated!


*Permissions*

- You are free to sell what you make from this pattern. I would appreciate links back to my blog, Ravelry, or Etsy shop to credit me as the designer.

- You may not use my photos.

- You may not sell this pattern or any part of this pattern, distribute it, or claim it as your own.


© 2020 Sarah Gross - Crafts by Sarah Liz

Wednesday, August 19, 2020

Washcloth Wednesday Part 4 - Windmill Washcloth

Today is the final installment of Washcloth Wednesday! Today's pattern is the Windmill Washcloth. This one was a little more work to get just right. The pattern is based off of my Windmill Face Scrubby, but the scrubby is round. After a couple tries, I ended up with this pattern, and I love how it looks! Don't forget to grab your copy of the Spa Collection E-book. It's on sale for 50% off through Friday!


Materials: 

H Hook (5mm) 

Worsted Weight Cotton Yarn #4 

Scissors

Needle for weaving in ends


Abbreviations (US terms):

Ch - Chain

Sl st – Slip Stitch

SC – Single Crochet

DC – Double Crochet

FPDC – Front Post Double Crochet

St(s) – Stitch(es)

RS – Right Side

WS – Wrong Side

Notes: 

Based on my tension, washcloth measures approximately 8 inches. You can use a larger or smaller hook to adjust the size, or repeat round 6 until you reach desired size.


Magic Ring Tutorial: 

https://www.pinterest.com/pin/459085755768457963/

FPDC Tutorial:

https://www.pinterest.com/pin/459085755766469437/ 


INSTRUCTIONS

1. Make Magic Ring. Ch 3 (counts as DC), DC 11 in ring. Pull ring tight to close. Sl st to top of Ch 3 to join. (12 sts)


2. Ch 3 (counts as DC), FPDC around Ch 3 from previous round. *DC in the top of the next st, FPDC around the SAME st.* Repeat around. Sl st to top of Ch 3 to join. (24 sts)


3. Ch 3 (counts as DC), DC in the top of the next st, FPDC around the SAME st. *DC in the top of the next st. DC in the top of the next st, FPDC around the SAME st.* Repeat * * around. Sl st to top of Ch 3 to join. (36 sts)


4. Ch 3 (counts as DC), DC in the top of the next 2 sts. FPDC around the SAME st. *DC in the top of the next 3 sts. FPDC around the SAME st.* Repeat * * around. Sl st to top of Ch 3 to join. (48 sts)


5. Ch 3 (counts as DC). 

Corner #1

In next st (2DC, FPDC around same st. Working behind the FPDC, 2DC in the same st). See photos below to help.


Side #1

DC in next st. FPDC around next st. *DC in next 3 sts, FPDC around next st*. Repeat * *one more time. DC in next st. 


Corner #2

In next st create corner #2 by repeating instructions for corner #1.


Side #2

Repeat instructions for side #1


Corner #3

In next st create corner #3 by repeating instructions for corner #1.


Side #3

Repeat instructions for side #1


Corner #4

In next st create corner #4 by repeating instructions for corner #1.


Side #4

Repeat instructions for side #1. After making the final FPDC for the side, join with sl st to the top of the Ch3 at the beginning of the round.


6. Ch 3 (counts as DC), DC in each DC from previous round until you get to the corner FPDC. 

Corner #1

In the corner FPDC, work corner #1 from round 5.


Side #1

DC in each DC, and FPDC around each FPDC along the side until you get to the next corner FPDC.


Corner #2

Repeat corner instructions.


Continue each side and corner around. Join with Sl st to top of Ch 3.


7.-8. Repeat round 6


9. Ch 1, SC in same st. SC in next 8 sts. *(SC, Ch 1, SC) in corner FPDC. SC in each st across side to next corner FPDC.* Repeat * * 3 more times, ending with Sl st to first SC to join.

Finishing:

Weave in any remaining ends.

I would love to see your crochet washcloths! Tag me on Instagram @craftsbysarahliz so I can see your work! Your support of my small business is truly appreciated!


Links to all of the Washcloth Wednesday patterns!


Permissions

- You are free to sell what you make from these patterns. I would appreciate links back to my blog, Ravelry, or Etsy shop to credit me as the designer.
- You may not use my photos.
- You may not sell this pattern or any part of these patterns, distribute them, or claim them as your own.

© 2020 Sarah Gross - Crafts by Sarah Liz

Wednesday, August 12, 2020

Washcloth Wednesday Part 3 - Sunburst Washcloth

Guess what day it is?! It's Wednesday again, which means it's time for another washcloth pattern. This week, I'm sharing my Sunburst Washcloth pattern that I based on the Sunburst Face Scrubby. This pattern features cluster stitches and picots for a washcloth that is easily adjustable to make larger or smaller.

As a reminder, the E-book containing all 8 patterns is still available for 50% off. That deal ends next week, so go get your copy!


Materials: 
H Hook (5mm) 
Worsted Weight Cotton Yarn #4 
Scissors
Needle for weaving in ends

Abbreviations (US terms):
Ch – Chain
Ch-Sp – Chain Space
Sl st – Slip Stitch
SC – Single Crochet
DC – Double Crochet
Cl st – Cluster Stitch
St(s) – Stitch(es)
RS – Right Side
WS – Wrong Side

Special Stitches:
2DC Cluster: 
Yarn over, insert hook and pull up a loop. Yarn over, draw through 2 loops (2 loops remaining on hook). Yarn over, insert hook in same st, and pull up a loop. Yarn over, draw through 2 loops (3 loops remaining on hook). Yarn over, draw through all remaining loops on hook.

3DC Cluster: 
Yarn over, insert hook and pull up a loop. Yarn over, draw through 2 loops (2 loops remaining on hook). 
Yarn over, insert hook in same st, and pull up a loop. Yarn over, draw through 2 loops (3 loops remaining on hook). Yarn over, insert hook in same st, and pull up a loop. Yarn over, draw through 2 loops (4 loops remaining on hook). Yarn over, draw through all remaining loops on hook.

Picot: 
After completing a SC, Ch2, sl st in 1st Ch.

Notes: 
Based on my tension, washcloth measures approximately 8 inches. You can use a larger or smaller hook to adjust the size, or keep repeating round 4 to make a bigger washcloth. 


INSTRUCTIONS

1. Make Magic Ring. Ch 3 (counts as DC), DC 11 in ring. Pull ring tight to close. Sl st to top of Ch 3 to join. (12 sts)

2. Ch 2, 2DC cluster in same st as Ch 2. *Ch 1, 3DC cluster in next st.* Repeat around. Ch1. Sl st to top of 2DC cluster to join.

3. Sl st to Ch-sp. Ch 2, 2DC cluster in Ch-sp. Ch 3, 3DC cluster in same Ch-sp. *Ch 1, 3DC cluster in next Ch-sp. Ch 1, 3dc cluster in next Ch-sp. Ch 1, (3DC cluster, Ch 3, 3DC cluster) in next Ch-sp.* Repeat * * one more time. Then, Ch 1, 3DC cluster in next Ch-sp. Ch 1, 3DC cluster in next Ch-sp. Ch 1, join with Sl st to first 2DC cluster.

4. Sl st to Ch3-sp. (Ch 2, 2DC cluster in ch-sp. Ch 3, 3DC cluster) in same Ch-sp. *Ch 2, 3DC cluster in next ch-sp.* Repeat * * to corner. Ch 2, (3DC cluster, Ch 3, 3DC cluster) in corner Ch-sp. Repeat * * again to corner. (3DC cluster, Ch 3, 3DC cluster) in corner Ch-sp. Repeat * * again to corner. (3DC cluster, Ch 3, 3DC cluster) in corner Ch-sp. Repeat * * again to beginning of round. Ch 2, join with Sl st to first 2DC cluster.

5.-7. Repeat round 4.

8. Sl st to Ch 3 sp. Ch 1. (SC 3, picot, SC 3) in same Ch3-sp. Picot. SC in Cl st. *2SC in Ch-sp. Picot. SC in Cl st.* Repeat * * to corner Ch-sp. (SC 3, picot, SC 3) in same Ch-sp. Repeat * * to corner Ch-sp. (SC 3, picot, SC 3) in same Ch-sp. Repeat * * to corner Ch-sp. (SC 3, picot, SC 3) in same Ch-sp. Repeat * * to end of round. Sl st to first SC to join.

Finishing:
Weave in any remaining ends.


I would love to see your crochet washcloths! Tag me on Instagram @craftsbysarahliz so I can see your work! Your support of my small business is truly appreciated!


Links to all of the Washcloth Wednesday patterns!


Permissions

- You are free to sell what you make from these patterns. I would appreciate links back to my blog, Ravelry, or Etsy shop to credit me as the designer.
- You may not use my photos.
- You may not sell this pattern or any part of these patterns, distribute them, or claim them as your own.

© 2020 Sarah Gross - Crafts by Sarah Liz

Wednesday, August 5, 2020

Washcloth Wednesday Part 2 - Puffy Clouds Washcloth

Happy Wednesday! The second installment of Washcloth Wednesday features the Puffy Clouds Washcloth. I made this washcloth to coordinate with my Puffy Clouds Face Scrubby. Puff stitches, combined with a soft cotton yarn makes the softest, puffiest washcloth ever! 

And you can still get the E-book containing all 4 washcloth patterns AND all 4 face scrubby patterns at 50% off!


Materials: 
H Hook (5mm) 
Worsted Weight Cotton Yarn #4 
Scissors
Needle for weaving in ends

Abbreviations (US terms):
Ch – Chain
Ch-sp – Chain Space
Sl st – Slip Stitch
DC – Double Crochet
Puff St – Puff Stitch
Sk – Skip 
St(s) – Stitch(es)
RS – Right Side
WS – Wrong Side

Notes: 
Based on my tension, washcloth measures approximately 8 inches. You can adjust your hook size to change the size of the washcloth.


Puff Stitch:
Yarn over, insert hook and draw up a loop (3 loops on hook)
Yarn over, insert hook in same st, draw up a loop (5 loops on hook)
Yarn over, insert hook in same st, draw up a loop (7 loops on hook)
Yarn over, and draw through all 7 loops on hook.


INSTRUCTIONS

1. Ch 25, puff st in the 4th st from hook. (the 3 skipped Chs count as a DC) *DC in the next Ch. Puff st in the next Ch.* Repeat * * across. Dc in the last Ch. (23 sts)

2. Ch 3 (counts as DC), turn. *Puff st in the next st. DC in the next st.* Repeat * * across to the last 2 sts. Puff st in the next st. DC in the top of the Ch 3 from the previous row.

3.-15. Repeat Row 2 until your washcloth is square.

Finishing:
Weave in any remaining ends.


I would love to see your crochet washcloths! Tag me on Instagram @craftsbysarahliz so I can see your work! Your support of my small business is truly appreciated!


Links to all of the Washcloth Wednesday patterns!


Permissions

- You are free to sell what you make from these patterns. I would appreciate links back to my blog, Ravelry, or Etsy shop to credit me as the designer.
- You may not use my photos.
- You may not sell this pattern or any part of these patterns, distribute them, or claim them as your own.

© 2020 Sarah Gross - Crafts by Sarah Liz

Wednesday, July 29, 2020

Washcloth Wednesday Part 1 - Flower Washcloth

Last year I designed 4 face scrubby patterns and released them in a Face Scrubby Friday series. I absolutely loved that series. And the face scrubbies have become some of my favorite things to use. I love that I never have to buy cotton facial rounds or cotton balls anymore. I have a set of scrubbies for removing makeup, and a set of scrubbies for removing nail polish.

This year I thought it would be nice to have some coordinating washcloths. The face scrubbies are nice, but sometimes I want a larger washcloth for washing my face. I am so happy to have 4 new washcloth patterns for you all! I will be sharing 1 new pattern each Wednesday for four weeks.

And I couldn't resist putting all 8 patterns together into an E-book! The E-book is available for purchase, and it is on sale at 50% off for the duration of the Washcloth Wednesday series. I also have a super special deal for the people in my VIP group on Facebook. So go request to join to find the awesomeness there!


Today I will be sharing my Flower Washcloth. The Flower Face Scrubby pattern was a popular one last year. The washcloth pattern has the same petal style stitches which creates a beautiful texture that goes so well with the face scrubby.

Materials: 
H Hook (5mm)
Worsted Weight Cotton Yarn #4
Scissors
Tape Measure to check gauge
Needle

Abbreviations (US terms):
Ch - chain
SC - single crochet
HDC – half double crochet
DC - double crochet
Sk – skip 
Sl st - slip stitch
RS – right side
WS – wrong side

Notes: 
Based on my tension, washcloth measures approximately 8 inches. You can increase/decrease the size of your washcloth by chaining a multiple of 5+2 sts. Example: for a smaller one, chain 27 sts and do fewer rows. For a larger one, chain 37 and do more rows. Alternatively, you can adjust your hook size to change the size of the washcloth.

INSTRUCTIONS

1. Ch 32. SC in 2nd Ch from hook. SC in each remaining Ch. (31 sts)

2. Ch 1, turn. Sk same st as turning Ch, sk next 2 sts. *5DC in next st. Sk 2 sts, Sl st in next st. Sk 2 sts.* 
Repeat * * across, ending with a Sl st in the last st.

3. Ch 3 (counts as a DC), turn. 2DC in the same st as turning Ch. *Sk 2 sts, Sl st in 3rd DC in the 5DC from previous row. Sk 2 sts, 5DC in sl st from previous row.* Repeat * * across, ending with 3DC in the turning Ch 1 from the previous row.

4. Ch 1, turn. Sk same st as turning Ch, sk next 2 sts. *5DC in Sl st from previous row. Sk 2 sts, Sl st in 3rd DC in the 5DC from previous row. Sk 2 sts.* Repeat * * across, ending with a Sl st in the top of the Ch 3 from the previous row. 

5.-16.  Repeat rows 3 and 4 until you have 16 total rows.

17. Ch 1, turn. SC in same st as turning Ch. SC in the next st. *HDC in the next st. DC in the Sl st from the previous row. HDC in the next st. SC in each of the next 3 sts.* Repeat * * across, ending with a SC in the top of the Ch 3 from the previous row. 

Border
18. Ch 1, turn. Sk same st as turning ch. *Sk next 2 sts. 5DC in the next st. Sk next 2 sts, Sl st in the next st.* Repeat * * across to end of row. Do NOT cut.

Now work on the side of the washcloth. 

*5DC on the side of the DC on the edge of row 16. 
Sl st on the side of the DC on the edge of row 14.*
Continue along the side in this manner.
5DC in the SC from row 1. Sl st in the first Ch from the foundation Ch. 

Now work on the bottom of the washcloth.

*Sk next 2 Ch, 5DC in next ch. Sk next 2 Ch, Sl st in the next Ch.* Repeat * * across, ending with a Sl st in the las Ch.

Now work on the other side of the washcloth. 

5DC on the side of the SC on the edge of row 1. 
*Sl st in the Ch 3 on the edge of row 3.
5DC in the Ch 3 on the edge of row 5.*
Continue along the side in this manner.
Sl st to Ch 1 at the beginning of the Border round 18. 

Finishing:
Weave in any remaining ends.


I would love to see your crochet washcloths! Tag me on Instagram @craftsbysarahliz so I can see your work! Your support of my small business is truly appreciated!

Links to all of the Washcloth Wednesday patterns!


Permissions

- You are free to sell what you make from these patterns. I would appreciate links back to my blog, Ravelry, or Etsy shop to credit me as the designer.
- You may not use my photos.
- You may not sell this pattern or any part of these patterns, distribute them, or claim them as your own.

© 2020 Sarah Gross - Crafts by Sarah Liz


Tuesday, July 14, 2020

Watermelon Baby Bib

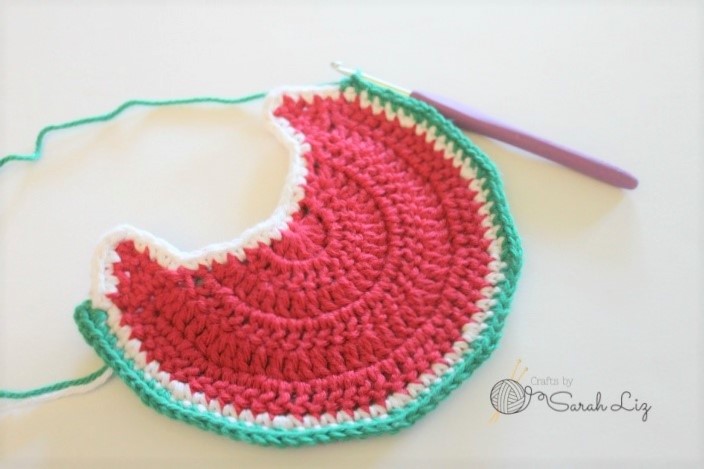
Three years ago I created and released a pattern for this watermelon baby bib. My daughter was proudly modeling it for me, and she definitely needed a drool bib at that age. Up until now it was only available as a paid pdf. But now I have decided to offer for free on my blog! Keep scrolling for instructions and step by step photos so you can make your own watermelon baby bibs!


Size:
Based on the tightness of my tension, the dimensions of the finished bib are approximately 6 inches wide and 4 inches long (not including ties). Feel free to go up or down hook sizes to adjust the size of the bib.


Materials:
G hook (4mm)
Worsted Weight Cotton Yarn (I used Hobby Lobby I Love This Cotton Yarn) in Red, White, Green, and Black.
Large eye needle for weaving in ends

Notes:
Ch 2 does not count as a stitch.

Abbreviations:
Ch - chain
Sc - single crochet
Dc - double crochet
Sl st - slip stitch
Sc decrease – single crochet decrease (single crochet 2 together)
RS – right side
WS – wrong side

Instructions:

Magic Circle

Row 1. 8dc, pull tight (8) RS

Row 2. Ch 2, turn, 2dc in each st across (16) WS
Row 3. Ch 2, turn, *2dc, dc in next*, repeat * * across (24) RS
Row 4. Ch 2, turn, *2dc, dc in next 2*, repeat * * across (32) WS
Row 5. Ch 2, turn, *2dc, dc in next 3*, repeat * * across (40) RS
Row 6. Ch 2, turn, *2dc, dc in next 4*, repeat * * across (48) WS
Cut yarn
Shoulder
Start at outer edge
Row 1. Join yarn with sl st, ch 1, and sc 5 sts evenly along neck edge.

Row 2. Ch 1, turn. Sc decrease, sc, sc decrease
Row 3. Ch 1, turn. Sc, sc Decrease
Row 4. Ch 1, turn. Sc decrease
Cut yarn

Shoulder 2
Turn work around, repeat other side starting on outside edge like the first side.

Now work the bib going all around the edge of the bib.

Change yarn to White
With RS facing, join White at last dc of round 6
Ch 1, *2sc, sc in next 5*, repeat across until you have (56) sts.
Sc along shoulder and neck edges, making sure to do 2sc in top point of shoulder.
When you reach back to the first sc, join with sl st.
  
Change yarn to Green
Join where you joined the white to end the last round.
Ch 1, *2sc, sc in next 6*, repeat across until you have (64) sts.
Sc along shoulder until you get to the top point of shoulder, make bib tie using instructions below.

Bib Tie
Ch 45, sl st in 2nd ch from hook, and sl st in each ch all the way back down to the bib. Continue sc down shoulder, along neckline, and up to the top of the second shoulder. Ch 45, sl st in 2nd ch from hook, and sl st in each ch all the way back down.

Continue sc down shoulder to beginning of round. Sl st to join.

Finishing
Weave in any loose ends. Using black yarn, make small stitches to create the seeds.

I would love to see your Watermelon Bibs! Tag me on Instagram @craftsbysarahliz so I can see your work! Your support of my small business is truly appreciated!


*Permissions*
-You are free to sell what you make from this pattern. I would appreciate links back to my blog, Ravelry, or Etsy shop to credit me as the designer. 
-You may not use my photos.
-You may not sell this pattern or any part of this pattern, distribute it, or claim it as your own.

© 2020 Sarah Gross - Crafts by Sarah Liz