Friday, March 13, 2020

Helena Cowl - Free Crochet Pattern

I received some beautiful hand dyed cotton yarn from my friend Liana at Wearable Personality. I knew I wanted a cotton scarf or cowl right away. I did some Pinterest searches and came across a beautiful stitch pattern from Annie's Attic that I just had to use. This cotton yarn is so soft, and my cowl is perfect for transitioning to spring from the heavy wool scarves and cowls that I use in the winter.

Size:
My finished cowl measures approximately 7.5 inches tall, and 28 inches around.

Materials:
Size H (5 mm) Crochet Hook
Worsted Weight Cotton Yarn #4 (I Love This Cotton) Approximately 150 yards
Scissors
Needle for weaving in ends
Tape Measure – For checking gauge, and length of cowl

Gauge:
16 sts in DC, 8 rows = 4 inches 
Check your gauge and adjust needle size accordingly.

Adjusting the pattern:
This stitch pattern uses a multiple of 12 sts plus 2. I chained 38 for my cowl. You can adjust the number of your starting chain to make your cowl wider or thinner.

This stitch pattern is a 4 row repeat. I made 48 rows total. You can adjust the number of rows that do to make your cowl longer or shorter around.

Abbreviations (US Terms):
CH – Chain
SC – Single Crochet
DC – Double Crochet
TRC – Treble Crochet
V-St – V Stitch (see notes)
CL-St – Cluster Stitch (see notes)
Sl St – Slip Stitch
Sk – Skip
Ch-Sp – Chain Space
St(s) – Stitch(es)

Notes:
CH 4 counts as TRC
CH 3 counts as a DC.
CH 1 does NOT count as a st.
This cowl is worked in rows. Turn at the beginning of each row.
Instructions that are inside parentheses are meant to be worked all in the same stitch, or chain space.
Repeat sections will be noted with * *

Tutorials:
Magic Ring Tutorial: https://www.pinterest.com/pin/459085755768457963/
V-St:  (DC, CH 1, DC) all in the same stitch.
V-Stitch Tutorial: https://www.pinterest.com/pin/459085755768457925/

Special Stitches:
Cluster Stitch (CL-St): 
Yarn over, insert hook and pull up a loop.
Yarn over, draw through 2 loops (2 loops remaining on hook).
Yarn over, insert hook and pull up a loop.
Yarn over, draw through 2 loops (3 loops remaining on hook).
Yarn over, draw through all remaining loops on hook.


Instructions:


CH 38
1. SC in 2nd Ch from hook. *Ch 2, sk the next 2 starting Ch, V-st in the next Ch. Ch 2, sk the next 2 starting Ch, SC in the next Ch.* Repeat * * across. (6 total V-sts)

2. CH 4 (counts as TRC), turn. *In next V-st Ch-Sp (CL-St, Ch 1, CL-St, Ch 1, CL-St). Ch 1* Repeat * *, working in each V-st Ch-Sp across until the last V-st. In the last V-st Ch-Sp, (CL-St, Ch 1, CL-St, Ch 1, CL-St). TRC in last SC in row. (18 total CL-Sts)

3. CH 1, turn. SC in same st as turning Ch. *Ch 1, SC in next Ch-Sp.* Repeat * * across. SC in top of Ch 4 from previous row. (19 total SCs)

4. CH 3 (counts as DC), turn. DC in next Ch-Sp. *Ch 1, DC in next Ch-Sp.* Repeat * * across. DC in last SC. (19 DCs, 1 CH 3 which counts as a DC. 20 total)

5. CH 1, turn. SC in same st as turning Ch. *Ch 2, Sk 1 DC and 1 CH, V-st in the next DC. Ch 2, Sk 1 CH and 1 DC, SC in the next Ch-Sp.* Repeat * * across, but make your final SC into the top of the Ch 3 from the previous row. (6 total V-sts)

Repeat rows 2-5 until desired length. I did 48 rows total.

Finishing:
Sl st ends of cowl together to form a loop.
Weave in any remaining ends.


I would love to see your Helena Cowls! Tag me on Instagram  @craftsbysarahliz so I can see your work!

I hope you enjoy my pattern. Your support of my small business is truly appreciated!


*Permissions*
- You are free to sell what you make from this pattern. I would appreciate links back to my blog, Ravelry, or Etsy shop to credit me as the designer.
- You may not use my photos.
- You may not sell this pattern or any part of this pattern, distribute it, or claim it as your own.

© 2020 Sarah Gross - Crafts by Sarah Liz


Wednesday, March 4, 2020

Spring Fashion Blog Hop - Free Crochet Patterns

I am overwhelmed by the wonderful response to my Gemma Shawl crochet pattern that I published a few days ago! It was my first time designing a shawl pattern to publish, and I am thrilled with how it turned out. I made it in Lion Brand Yarn 24/7 Cotton so I could wear it in the spring. I am in Idaho, so we don't actually get spring weather in the spring. We had a hint of spring when we took the photos, but then the very next day it was snowing again! For being cotton, the shawl actually helped keep me cozy while standing in the wind. When spring actually gets here, you know in May, I will have my Gemma Shawl ready. 
I am even more excited because today I get to share the free pdf with you all as part of the E'Claire Makery Spring Fashion Blog Hop! Go to her post HERE to find the coupon code that you need in order to get the pattern for free. But you need to hurry, because this pattern will only be available for free until 6am PST on March 6th.


The response to the Spring Blog Hop has been so amazing that the patterns are available for an extra day! So in case you missed it before, go to Claire's post HERE to find the coupon code that you need in order to get the pattern for free. Code expires 6am PDT on April 3rd.


I can't wait to start seeing more Gemma Shawls being made!
Tag me on Instagram  @craftsbysarahliz so I can see your work!
I hope you enjoy my pattern. Your support of my small business is truly appreciated!

*Permissions*
- You are free to sell what you make from this pattern. I would appreciate links back to my blog, Ravelry, or Etsy shop to credit me as the designer.
- You may not use my photos.
- You may not sell this pattern or any part of this pattern, distribute it, or claim it as your own.

© 2020 Sarah Gross - Crafts by Sarah Liz 


Monday, March 2, 2020

Maxine Bonnet - Free Crochet Pattern

One of my main goals in 2020 as a designer has been to design and release more crochet patterns. It's the beginning of March, and with this new pattern that I am going to share, I have now released 4 crochet patterns this year! Maybe this will be a resolution that I actually keep.


This particular pattern today has been a fun one. My girl Maxine has been my bonnet baby. Her sweet little face is made for bonnets! So I named this bonnet design just for her. I wanted a fun textured stitch that wasn't overly complicated. I used alternating front post and back post stitches to create the Maxine Baby Bonnet crochet pattern. The newborn size is available for free below. The pdf's with all six sizes from newborn to 1-2 years are available on my Ravelry and Etsy shops. Or for you non-crocheters, you can purchase the actual bonnet from my Etsy shop as well.


Size:
Newborn

Materials:
H Hook (5mm)
Worsted Weight Yarn #4 (Caron Simply Soft) Approximately 75 yards
Scissors
Needle for weaving in ends
Tape measure – for checking gauge, and length of bonnet before finishing
Optional – Pom pom maker, or furry pom

Gauge:
15 sts, 10 rows = 4 inches
Pattern for gauge: alternating FPDC and BPDC (see row 2 of pattern)
I tend to crochet tightly, so check your gauge and adjust hook size accordingly. You may need to go down a hook size.

Abbreviations (US terms):
CH – Chain
Sl St – Slip Stitch
SC – Single Crochet
DC – Double Crochet
FPDC – Front Post Double Crochet
BPDC – Back Post Double Crochet
St(s) – Stitch(es)
RS – Right Side
WS – Wrong Side

Notes:
Repeat sections are notated with *  *
Ch 3 does count as a DC.

FPDC and BPDC Tutorial:
https://www.pinterest.com/pin/459085755766469437/

Instructions:

Newborn 

CH 43  
1.      DC in 4th CH from hook (the previous 3 CH count as a DC). DC in each of the remaining CH. 41 sts 
2.      RS. CH 3 (counts as a DC), turn. *BPDC in the next st, FPDC in the next st.* Repeat * * across. BPDC in the next. DC in the top of the CH 3 from the previous row. 
Repeat row 2 until your bonnet measures 5.25  inches from the starting CH row.

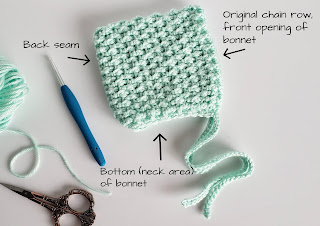
CH 1, turn. Fold bonnet in half, with right sides together. 

Sl St through both layers to join the back of the bonnet.


After you have finished the last Sl St, cut yarn, weave in end, and turn the bonnet right side out

Bottom Edge (Neck Area) of Bonnet
With the back seam facing you (right side out), attach yarn in the corner to the right. 
 
CH 50. Sl St in 2nd CH from the hook, and in each remaining CH. 

Now SC evenly across the bottom of the bonnet. SC only 1 st per row. This will help cinch the bottom of the bonnet so it isn’t too loose around the back of the head/neck. 

When you reach the end of the row, CH 50. Sl St in 2nd CH from the hook, and in each remaining CH. Sl St to corner of the bonnet.  

Cut yarn and weave in ends. If desired, attach pom to the top point of the bonnet. 

I would love to see your Maxine Baby Bonnets! Tag me on instagram @craftsbysarahliz so I can see your work!

 *Permissions*
- You are free to sell what you make from this pattern. I would appreciate links back to my blog, Ravelry, or Etsy shop to credit me as the designer.
- You may not use my photos.
- You may not sell this pattern, distribute it, or claim it as your own.

© 2020 Sarah Gross - Crafts by Sarah Liz