Wednesday, August 19, 2020

Washcloth Wednesday Part 4 - Windmill Washcloth

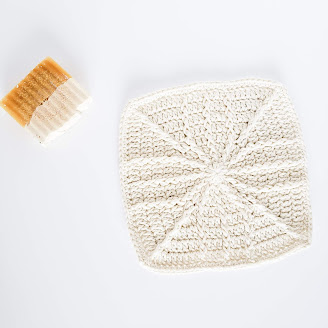
Today is the final installment of Washcloth Wednesday! Today's pattern is the Windmill Washcloth. This one was a little more work to get just right. The pattern is based off of my Windmill Face Scrubby, but the scrubby is round. After a couple tries, I ended up with this pattern, and I love how it looks! Don't forget to grab your copy of the Spa Collection E-book. It's on sale for 50% off through Friday!


Materials: 

H Hook (5mm) 

Worsted Weight Cotton Yarn #4 

Scissors

Needle for weaving in ends


Abbreviations (US terms):

Ch - Chain

Sl st – Slip Stitch

SC – Single Crochet

DC – Double Crochet

FPDC – Front Post Double Crochet

St(s) – Stitch(es)

RS – Right Side

WS – Wrong Side

Notes: 

Based on my tension, washcloth measures approximately 8 inches. You can use a larger or smaller hook to adjust the size, or repeat round 6 until you reach desired size.


Magic Ring Tutorial: 

https://www.pinterest.com/pin/459085755768457963/

FPDC Tutorial:

https://www.pinterest.com/pin/459085755766469437/ 


INSTRUCTIONS

1. Make Magic Ring. Ch 3 (counts as DC), DC 11 in ring. Pull ring tight to close. Sl st to top of Ch 3 to join. (12 sts)


2. Ch 3 (counts as DC), FPDC around Ch 3 from previous round. *DC in the top of the next st, FPDC around the SAME st.* Repeat around. Sl st to top of Ch 3 to join. (24 sts)


3. Ch 3 (counts as DC), DC in the top of the next st, FPDC around the SAME st. *DC in the top of the next st. DC in the top of the next st, FPDC around the SAME st.* Repeat * * around. Sl st to top of Ch 3 to join. (36 sts)


4. Ch 3 (counts as DC), DC in the top of the next 2 sts. FPDC around the SAME st. *DC in the top of the next 3 sts. FPDC around the SAME st.* Repeat * * around. Sl st to top of Ch 3 to join. (48 sts)


5. Ch 3 (counts as DC). 

Corner #1

In next st (2DC, FPDC around same st. Working behind the FPDC, 2DC in the same st). See photos below to help.


Side #1

DC in next st. FPDC around next st. *DC in next 3 sts, FPDC around next st*. Repeat * *one more time. DC in next st. 


Corner #2

In next st create corner #2 by repeating instructions for corner #1.


Side #2

Repeat instructions for side #1


Corner #3

In next st create corner #3 by repeating instructions for corner #1.


Side #3

Repeat instructions for side #1


Corner #4

In next st create corner #4 by repeating instructions for corner #1.


Side #4

Repeat instructions for side #1. After making the final FPDC for the side, join with sl st to the top of the Ch3 at the beginning of the round.


6. Ch 3 (counts as DC), DC in each DC from previous round until you get to the corner FPDC. 

Corner #1

In the corner FPDC, work corner #1 from round 5.


Side #1

DC in each DC, and FPDC around each FPDC along the side until you get to the next corner FPDC.


Corner #2

Repeat corner instructions.


Continue each side and corner around. Join with Sl st to top of Ch 3.


7.-8. Repeat round 6


9. Ch 1, SC in same st. SC in next 8 sts. *(SC, Ch 1, SC) in corner FPDC. SC in each st across side to next corner FPDC.* Repeat * * 3 more times, ending with Sl st to first SC to join.

Finishing:

Weave in any remaining ends.
I would love to see your crochet washcloths! Tag me on Instagram @craftsbysarahliz so I can see your work! Your support of my small business is truly appreciated!


Links to all of the Washcloth Wednesday patterns!


Permissions

- You are free to sell what you make from these patterns. I would appreciate links back to my blog, Ravelry, or Etsy shop to credit me as the designer.
- You may not use my photos.
- You may not sell this pattern or any part of these patterns, distribute them, or claim them as your own.

© 2020 Sarah Gross - Crafts by Sarah Liz

Wednesday, August 12, 2020

Washcloth Wednesday Part 3 - Sunburst Washcloth

Guess what day it is?! It's Wednesday again, which means it's time for another washcloth pattern. This week, I'm sharing my Sunburst Washcloth pattern that I based on the Sunburst Face Scrubby. This pattern features cluster stitches and picots for a washcloth that is easily adjustable to make larger or smaller.

As a reminder, the E-book containing all 8 patterns is still available for 50% off. That deal ends next week, so go get your copy!


Materials: 
H Hook (5mm) 
Worsted Weight Cotton Yarn #4 
Scissors
Needle for weaving in ends

Abbreviations (US terms):
Ch – Chain
Ch-Sp – Chain Space
Sl st – Slip Stitch
SC – Single Crochet
DC – Double Crochet
Cl st – Cluster Stitch
St(s) – Stitch(es)
RS – Right Side
WS – Wrong Side

Special Stitches:
2DC Cluster: 
Yarn over, insert hook and pull up a loop. Yarn over, draw through 2 loops (2 loops remaining on hook). Yarn over, insert hook in same st, and pull up a loop. Yarn over, draw through 2 loops (3 loops remaining on hook). Yarn over, draw through all remaining loops on hook.

3DC Cluster: 
Yarn over, insert hook and pull up a loop. Yarn over, draw through 2 loops (2 loops remaining on hook). 
Yarn over, insert hook in same st, and pull up a loop. Yarn over, draw through 2 loops (3 loops remaining on hook). Yarn over, insert hook in same st, and pull up a loop. Yarn over, draw through 2 loops (4 loops remaining on hook). Yarn over, draw through all remaining loops on hook.

Picot: 
After completing a SC, Ch2, sl st in 1st Ch.

Notes: 
Based on my tension, washcloth measures approximately 8 inches. You can use a larger or smaller hook to adjust the size, or keep repeating round 4 to make a bigger washcloth. 


INSTRUCTIONS

1. Make Magic Ring. Ch 3 (counts as DC), DC 11 in ring. Pull ring tight to close. Sl st to top of Ch 3 to join. (12 sts)

2. Ch 2, 2DC cluster in same st as Ch 2. *Ch 1, 3DC cluster in next st.* Repeat around. Ch1. Sl st to top of 2DC cluster to join.

3. Sl st to Ch-sp. Ch 2, 2DC cluster in Ch-sp. Ch 3, 3DC cluster in same Ch-sp. *Ch 1, 3DC cluster in next Ch-sp. Ch 1, 3dc cluster in next Ch-sp. Ch 1, (3DC cluster, Ch 3, 3DC cluster) in next Ch-sp.* Repeat * * one more time. Then, Ch 1, 3DC cluster in next Ch-sp. Ch 1, 3DC cluster in next Ch-sp. Ch 1, join with Sl st to first 2DC cluster.

4. Sl st to Ch3-sp. (Ch 2, 2DC cluster in ch-sp. Ch 3, 3DC cluster) in same Ch-sp. *Ch 2, 3DC cluster in next ch-sp.* Repeat * * to corner. Ch 2, (3DC cluster, Ch 3, 3DC cluster) in corner Ch-sp. Repeat * * again to corner. (3DC cluster, Ch 3, 3DC cluster) in corner Ch-sp. Repeat * * again to corner. (3DC cluster, Ch 3, 3DC cluster) in corner Ch-sp. Repeat * * again to beginning of round. Ch 2, join with Sl st to first 2DC cluster.

5.-7. Repeat round 4.

8. Sl st to Ch 3 sp. Ch 1. (SC 3, picot, SC 3) in same Ch3-sp. Picot. SC in Cl st. *2SC in Ch-sp. Picot. SC in Cl st.* Repeat * * to corner Ch-sp. (SC 3, picot, SC 3) in same Ch-sp. Repeat * * to corner Ch-sp. (SC 3, picot, SC 3) in same Ch-sp. Repeat * * to corner Ch-sp. (SC 3, picot, SC 3) in same Ch-sp. Repeat * * to end of round. Sl st to first SC to join.

Finishing:
Weave in any remaining ends.


I would love to see your crochet washcloths! Tag me on Instagram @craftsbysarahliz so I can see your work! Your support of my small business is truly appreciated!


Links to all of the Washcloth Wednesday patterns!


Permissions

- You are free to sell what you make from these patterns. I would appreciate links back to my blog, Ravelry, or Etsy shop to credit me as the designer.
- You may not use my photos.
- You may not sell this pattern or any part of these patterns, distribute them, or claim them as your own.

© 2020 Sarah Gross - Crafts by Sarah Liz

Wednesday, August 5, 2020

Washcloth Wednesday Part 2 - Puffy Clouds Washcloth

Happy Wednesday! The second installment of Washcloth Wednesday features the Puffy Clouds Washcloth. I made this washcloth to coordinate with my Puffy Clouds Face Scrubby. Puff stitches, combined with a soft cotton yarn makes the softest, puffiest washcloth ever! 

And you can still get the E-book containing all 4 washcloth patterns AND all 4 face scrubby patterns at 50% off!


Materials: 
H Hook (5mm) 
Worsted Weight Cotton Yarn #4 
Scissors
Needle for weaving in ends

Abbreviations (US terms):
Ch – Chain
Ch-sp – Chain Space
Sl st – Slip Stitch
DC – Double Crochet
Puff St – Puff Stitch
Sk – Skip 
St(s) – Stitch(es)
RS – Right Side
WS – Wrong Side

Notes: 
Based on my tension, washcloth measures approximately 8 inches. You can adjust your hook size to change the size of the washcloth.


Puff Stitch:
Yarn over, insert hook and draw up a loop (3 loops on hook)
Yarn over, insert hook in same st, draw up a loop (5 loops on hook)
Yarn over, insert hook in same st, draw up a loop (7 loops on hook)
Yarn over, and draw through all 7 loops on hook.


INSTRUCTIONS

1. Ch 25, puff st in the 4th st from hook. (the 3 skipped Chs count as a DC) *DC in the next Ch. Puff st in the next Ch.* Repeat * * across. Dc in the last Ch. (23 sts)

2. Ch 3 (counts as DC), turn. *Puff st in the next st. DC in the next st.* Repeat * * across to the last 2 sts. Puff st in the next st. DC in the top of the Ch 3 from the previous row.

3.-15. Repeat Row 2 until your washcloth is square.

Finishing:
Weave in any remaining ends.


I would love to see your crochet washcloths! Tag me on Instagram @craftsbysarahliz so I can see your work! Your support of my small business is truly appreciated!


Links to all of the Washcloth Wednesday patterns!


Permissions

- You are free to sell what you make from these patterns. I would appreciate links back to my blog, Ravelry, or Etsy shop to credit me as the designer.
- You may not use my photos.
- You may not sell this pattern or any part of these patterns, distribute them, or claim them as your own.

© 2020 Sarah Gross - Crafts by Sarah Liz