Friday, July 31, 2020

I-Cord Bind Off with Cable Twist - Knitting Tutorial

Today I am sharing a video tutorial that I created to show a fascinating bind off that I just tried for the first time. I was making a shawl for myself, and I had a cable running up one side of it. When it came time to bind off, I decided to try an I-cord bind off. If you've never done an I-cord bind off, you can find a tutorial here.


I really liked how it looked, especially with a cable twist thrown in, but I didn't like how long it took. I realized that by using 2 dpn's, I didn't have to transfer the I-cord stitches back onto the left needle. I could just slide it on over to the other side of the dpn, and keep going. It was so much faster, and I got into a really good rhythm and finished it much more quickly than I thought it would take. I decided that I needed to make a video to show my method.


Here are some more details to help you get the perfect I-cord bind off for your project:

I used 6 knit stitches before decreasing at the end of the I-cord. Typically 2-3 stitches are used, but I needed to match the 4 stitch cable on the other side of the shawl. Since the I-cord pulls some of the stitches around towards the back, a 6 stitch cable on the I-cord looked more like the 4 stitch cable on the side of the shawl.

Some I-cord tutorials show a Knit 2 together through the back loop (K2togtbl), but I used a Purl 2 together (P2tog) to give the cable a little more definition from the rest of the I-cord.

The bind off looked perfect after I blocked my shawl. I highly recommend blocking your knit shawls. It prevents curling, and really helps define those gorgeous cables. 


I hope this tutorial is informative and helpful! If you try out this method, feel free to tag me @craftsbysarahliz so I can see your beautiful work! I will be typing up my shawl pattern soon, so be on the lookout for the pattern.

Happy Knitting!
-Sarah Liz

Wednesday, July 29, 2020

Washcloth Wednesday Part 1 - Flower Washcloth

Last year I designed 4 face scrubby patterns and released them in a Face Scrubby Friday series. I absolutely loved that series. And the face scrubbies have become some of my favorite things to use. I love that I never have to buy cotton facial rounds or cotton balls anymore. I have a set of scrubbies for removing makeup, and a set of scrubbies for removing nail polish.

This year I thought it would be nice to have some coordinating washcloths. The face scrubbies are nice, but sometimes I want a larger washcloth for washing my face. I am so happy to have 4 new washcloth patterns for you all! I will be sharing 1 new pattern each Wednesday for four weeks.

And I couldn't resist putting all 8 patterns together into an E-book! The E-book is available for purchase, and it is on sale at 50% off for the duration of the Washcloth Wednesday series. I also have a super special deal for the people in my VIP group on Facebook. So go request to join to find the awesomeness there!


Today I will be sharing my Flower Washcloth. The Flower Face Scrubby pattern was a popular one last year. The washcloth pattern has the same petal style stitches which creates a beautiful texture that goes so well with the face scrubby.

Materials: 
H Hook (5mm)
Worsted Weight Cotton Yarn #4
Scissors
Tape Measure to check gauge
Needle

Abbreviations (US terms):
Ch - chain
SC - single crochet
HDC – half double crochet
DC - double crochet
Sk – skip 
Sl st - slip stitch
RS – right side
WS – wrong side

Notes
Based on my tension, washcloth measures approximately 8 inches. You can increase/decrease the size of your washcloth by chaining a multiple of 5+2 sts. Example: for a smaller one, chain 27 sts and do fewer rows. For a larger one, chain 37 and do more rows. Alternatively, you can adjust your hook size to change the size of the washcloth.

INSTRUCTIONS

1. Ch 32. SC in 2nd Ch from hook. SC in each remaining Ch. (31 sts)

2. Ch 1, turn. Sk same st as turning Ch, sk next 2 sts. *5DC in next st. Sk 2 sts, Sl st in next st. Sk 2 sts.* 
Repeat * * across, ending with a Sl st in the last st.

3. Ch 3 (counts as a DC), turn. 2DC in the same st as turning Ch. *Sk 2 sts, Sl st in 3rd DC in the 5DC from previous row. Sk 2 sts, 5DC in sl st from previous row.* Repeat * * across, ending with 3DC in the turning Ch 1 from the previous row.

4. Ch 1, turn. Sk same st as turning Ch, sk next 2 sts. *5DC in Sl st from previous row. Sk 2 sts, Sl st in 3rd DC in the 5DC from previous row. Sk 2 sts.* Repeat * * across, ending with a Sl st in the top of the Ch 3 from the previous row. 

5.-16.  Repeat rows 3 and 4 until you have 16 total rows.

17. Ch 1, turn. SC in same st as turning Ch. SC in the next st. *HDC in the next st. DC in the Sl st from the previous row. HDC in the next st. SC in each of the next 3 sts.* Repeat * * across, ending with a SC in the top of the Ch 3 from the previous row. 

Border
18. Ch 1, turn. Sk same st as turning ch. *Sk next 2 sts. 5DC in the next st. Sk next 2 sts, Sl st in the next st.* Repeat * * across to end of row. Do NOT cut.

Now work on the side of the washcloth. 

*5DC on the side of the DC on the edge of row 16. 
Sl st on the side of the DC on the edge of row 14.*
Continue along the side in this manner.
5DC in the SC from row 1. Sl st in the first Ch from the foundation Ch. 

Now work on the bottom of the washcloth.

*Sk next 2 Ch, 5DC in next ch. Sk next 2 Ch, Sl st in the next Ch.* Repeat * * across, ending with a Sl st in the las Ch.

Now work on the other side of the washcloth. 

5DC on the side of the SC on the edge of row 1. 
*Sl st in the Ch 3 on the edge of row 3.
5DC in the Ch 3 on the edge of row 5.*
Continue along the side in this manner.
Sl st to Ch 1 at the beginning of the Border round 18. 

Finishing:
Weave in any remaining ends.


I would love to see your crochet washcloths! Tag me on Instagram @craftsbysarahliz so I can see your work! Your support of my small business is truly appreciated!

Links to all of the Washcloth Wednesday patterns!


Permissions

- You are free to sell what you make from these patterns. I would appreciate links back to my blog, Ravelry, or Etsy shop to credit me as the designer.
- You may not use my photos.
- You may not sell this pattern or any part of these patterns, distribute them, or claim them as your own.

© 2020 Sarah Gross - Crafts by Sarah Liz


Tuesday, July 14, 2020

Watermelon Baby Bib

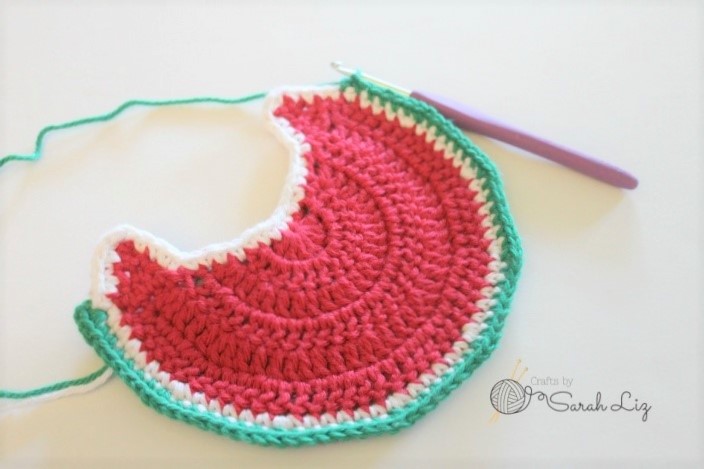
Three years ago I created and released a pattern for this watermelon baby bib. My daughter was proudly modeling it for me, and she definitely needed a drool bib at that age. Up until now it was only available as a paid pdf. But now I have decided to offer for free on my blog! Keep scrolling for instructions and step by step photos so you can make your own watermelon baby bibs!


Size:
Based on the tightness of my tension, the dimensions of the finished bib are approximately 6 inches wide and 4 inches long (not including ties). Feel free to go up or down hook sizes to adjust the size of the bib.


Materials:
G hook (4mm)
Worsted Weight Cotton Yarn (I used Hobby Lobby I Love This Cotton Yarn) in Red, White, Green, and Black.
Large eye needle for weaving in ends

Notes:
Ch 2 does not count as a stitch.

Abbreviations:
Ch - chain
Sc - single crochet
Dc - double crochet
Sl st - slip stitch
Sc decrease – single crochet decrease (single crochet 2 together)
RS – right side
WS – wrong side

Instructions:

Magic Circle

Row 1. 8dc, pull tight (8) RS

Row 2. Ch 2, turn, 2dc in each st across (16) WS
Row 3. Ch 2, turn, *2dc, dc in next*, repeat * * across (24) RS
Row 4. Ch 2, turn, *2dc, dc in next 2*, repeat * * across (32) WS
Row 5. Ch 2, turn, *2dc, dc in next 3*, repeat * * across (40) RS
Row 6. Ch 2, turn, *2dc, dc in next 4*, repeat * * across (48) WS
Cut yarn
Shoulder
Start at outer edge
Row 1. Join yarn with sl st, ch 1, and sc 5 sts evenly along neck edge.

Row 2. Ch 1, turn. Sc decrease, sc, sc decrease
Row 3. Ch 1, turn. Sc, sc Decrease
Row 4. Ch 1, turn. Sc decrease
Cut yarn

Shoulder 2
Turn work around, repeat other side starting on outside edge like the first side.

Now work the bib going all around the edge of the bib.

Change yarn to White
With RS facing, join White at last dc of round 6
Ch 1, *2sc, sc in next 5*, repeat across until you have (56) sts.
Sc along shoulder and neck edges, making sure to do 2sc in top point of shoulder.
When you reach back to the first sc, join with sl st.
  
Change yarn to Green
Join where you joined the white to end the last round.
Ch 1, *2sc, sc in next 6*, repeat across until you have (64) sts.
Sc along shoulder until you get to the top point of shoulder, make bib tie using instructions below.

Bib Tie
Ch 45, sl st in 2nd ch from hook, and sl st in each ch all the way back down to the bib. Continue sc down shoulder, along neckline, and up to the top of the second shoulder. Ch 45, sl st in 2nd ch from hook, and sl st in each ch all the way back down.

Continue sc down shoulder to beginning of round. Sl st to join.

Finishing
Weave in any loose ends. Using black yarn, make small stitches to create the seeds.

I would love to see your Watermelon Bibs! Tag me on Instagram @craftsbysarahliz so I can see your work! Your support of my small business is truly appreciated!


*Permissions*
-You are free to sell what you make from this pattern. I would appreciate links back to my blogRavelry, or Etsy shop to credit me as the designer. 
-You may not use my photos.
-You may not sell this pattern or any part of this pattern, distribute it, or claim it as your own.

© 2020 Sarah Gross - Crafts by Sarah Liz


Monday, July 6, 2020

Quick Crochet Flower - Free Pattern

Occasionally I will treat myself with some special yarn. Lately I've been loving hand dyed yarn. I got some beautiful yarn from Wearable Personality (go check out her new yarn shop Fashion Fiber Co.) and I made my Helena Cowl pattern. I only had a little bit of yarn left, and I hate to let such pretty yarn go to waste.

I chose to use the remaining yarn to make flowers for my 3 daughters. They love hair pretties, and I had just enough yarn left to make the 3 flowers. I attached 2 of them to hair clips for my older daughters, and attached the last one to a nylon headband for my youngest.

Materials:
Small amounts of yarn (I used worsted weight #4 yarn)
Desired hook size (I used a size H 5mm hook)
Scissors
Needle for weaving in ends
Optional - hair clips or nylon headbands

Abbreviations (US terms):
Sl st - Slip Stitch
CH - Chain
Ch-sp - Chain Space
SC - Single Crochet
HDC - Half Double Crochet
St(s) - Stitch(es)

Notes:
This flower is worked in the round.
Repeat sections will be noted with * *
Magic Ring Tutorial

Instructions
Make Magic Ring

1. *SC in ring. CH 3.* Repeat * * until you have 5 SC. CH 3, sl st to first SC to join. Pull ring tight to close. (you should have 6 Ch 3-sp)


2. Sl st into 1st ch 3-sp. *CH 1, 3HDC in ch 3-sp. CH 1. Sl st into same ch 3-sp. Sl st into next ch 3-sp.* Repeat * * around, making your final sl st into the first ch 3-sp to join. (6 petals)

3. *Sl st into the ch 1 in the first petal. Make 1 SC in each of the HDCs in the petal. Sl st into the last ch 1 of the same petal. Sl st into the next petal's ch 1.* Repeat * * for each petal. 

Cut yarn. Weave in ends, attaching them to clips or headbands as desired.

I would love to see your crochet flowers! Tag me on Instagram @craftsbysarahliz so I can see your work! Your support of my small business is truly appreciated!
*Permissions*
-You are free to sell what you make from this pattern. I would appreciate links back to my blog, Ravelry, or Etsy shop to credit me as the designer. 
-You may not use my photos.
-You may not sell this pattern or any part of this pattern, distribute it, or claim it as your own.

© 2020 Sarah Gross - Crafts by Sarah Liz