Friday, June 23, 2023

Seed Stitch Baby Blanket - Free Knitting Pattern

I have wanted to make this baby blanket for a while now. I finally made the time for it because we were moving our youngest out of her crib, and I knew I needed to get photos in her nursery before we sold her baby furniture. So these are some of the final photos of her cute nursery. 

This beginner friendly pattern combines simple color changes with some fun texture. It works up quickly, and makes a great baby shower gift.


This post contains affiliate links. Affiliate links are no extra cost to you. See full affiliate disclosure here. 

I used Lion Brand Wool Ease Thick & Quick for this simple and quick design. Or you can use your favorite super bulky yarn. Using my favorite row counters from Twice Sheared Sheep was incredibly useful for remembering when to change colors.

The finished blanket ended up 28x28 inches. Next time I might add more rows for a rectangle blanket.

Materials:
Size 15 needles - I used circulars with a longer cord
4 skeins Lion Brand WETQ in 2 colors - I used 1.5 skeins of the Blush, and just over 1 skein of the Fisherman
Row Counter - Optional

Abbreviations:
K - Knit
P - Purl
St (s) - Stitch(es)

Instructions:

Cast on 65 sts with your main color (you can adjust this number to make it wider, make sure you use an odd number of stitches)

1. *K1, p1* across. K last st
2-20.    Repeat row 1
Change color

21. K1, p1, k1, p1, k1, p1. K to last 6 sts. P1, k1, p1, k1, p1, k1.
22. K1, p1, k1, p1, k1. P to last 5 sts. K1, p1, k1, p1, k1.
23-40. Repeat last 2 rows.
Change color

41. Repeat row 21.
42-60. K1, p1 across.
Change color

61-80. Repeat rows 21-40.
Change color

81-100. Repeat rows 41-60.

Finishing:
Bind off knitwise (not too tightly). Weave in ends.


I would love to see your blankets! Tag me on Instagram @craftsbysarahliz so I can see your work. 

*Permissions*

- You are free to sell what you make from this pattern. I would appreciate links back to my blog, Ravelry, or Etsy shop to credit me as the designer.

- You may not use my photos.

- You may not sell this pattern, or any part of this pattern, distribute it, or claim it as your own.


© 2023 Sarah Gross - Crafts by Sarah Liz


Saturday, March 25, 2023

Persephone Wrap

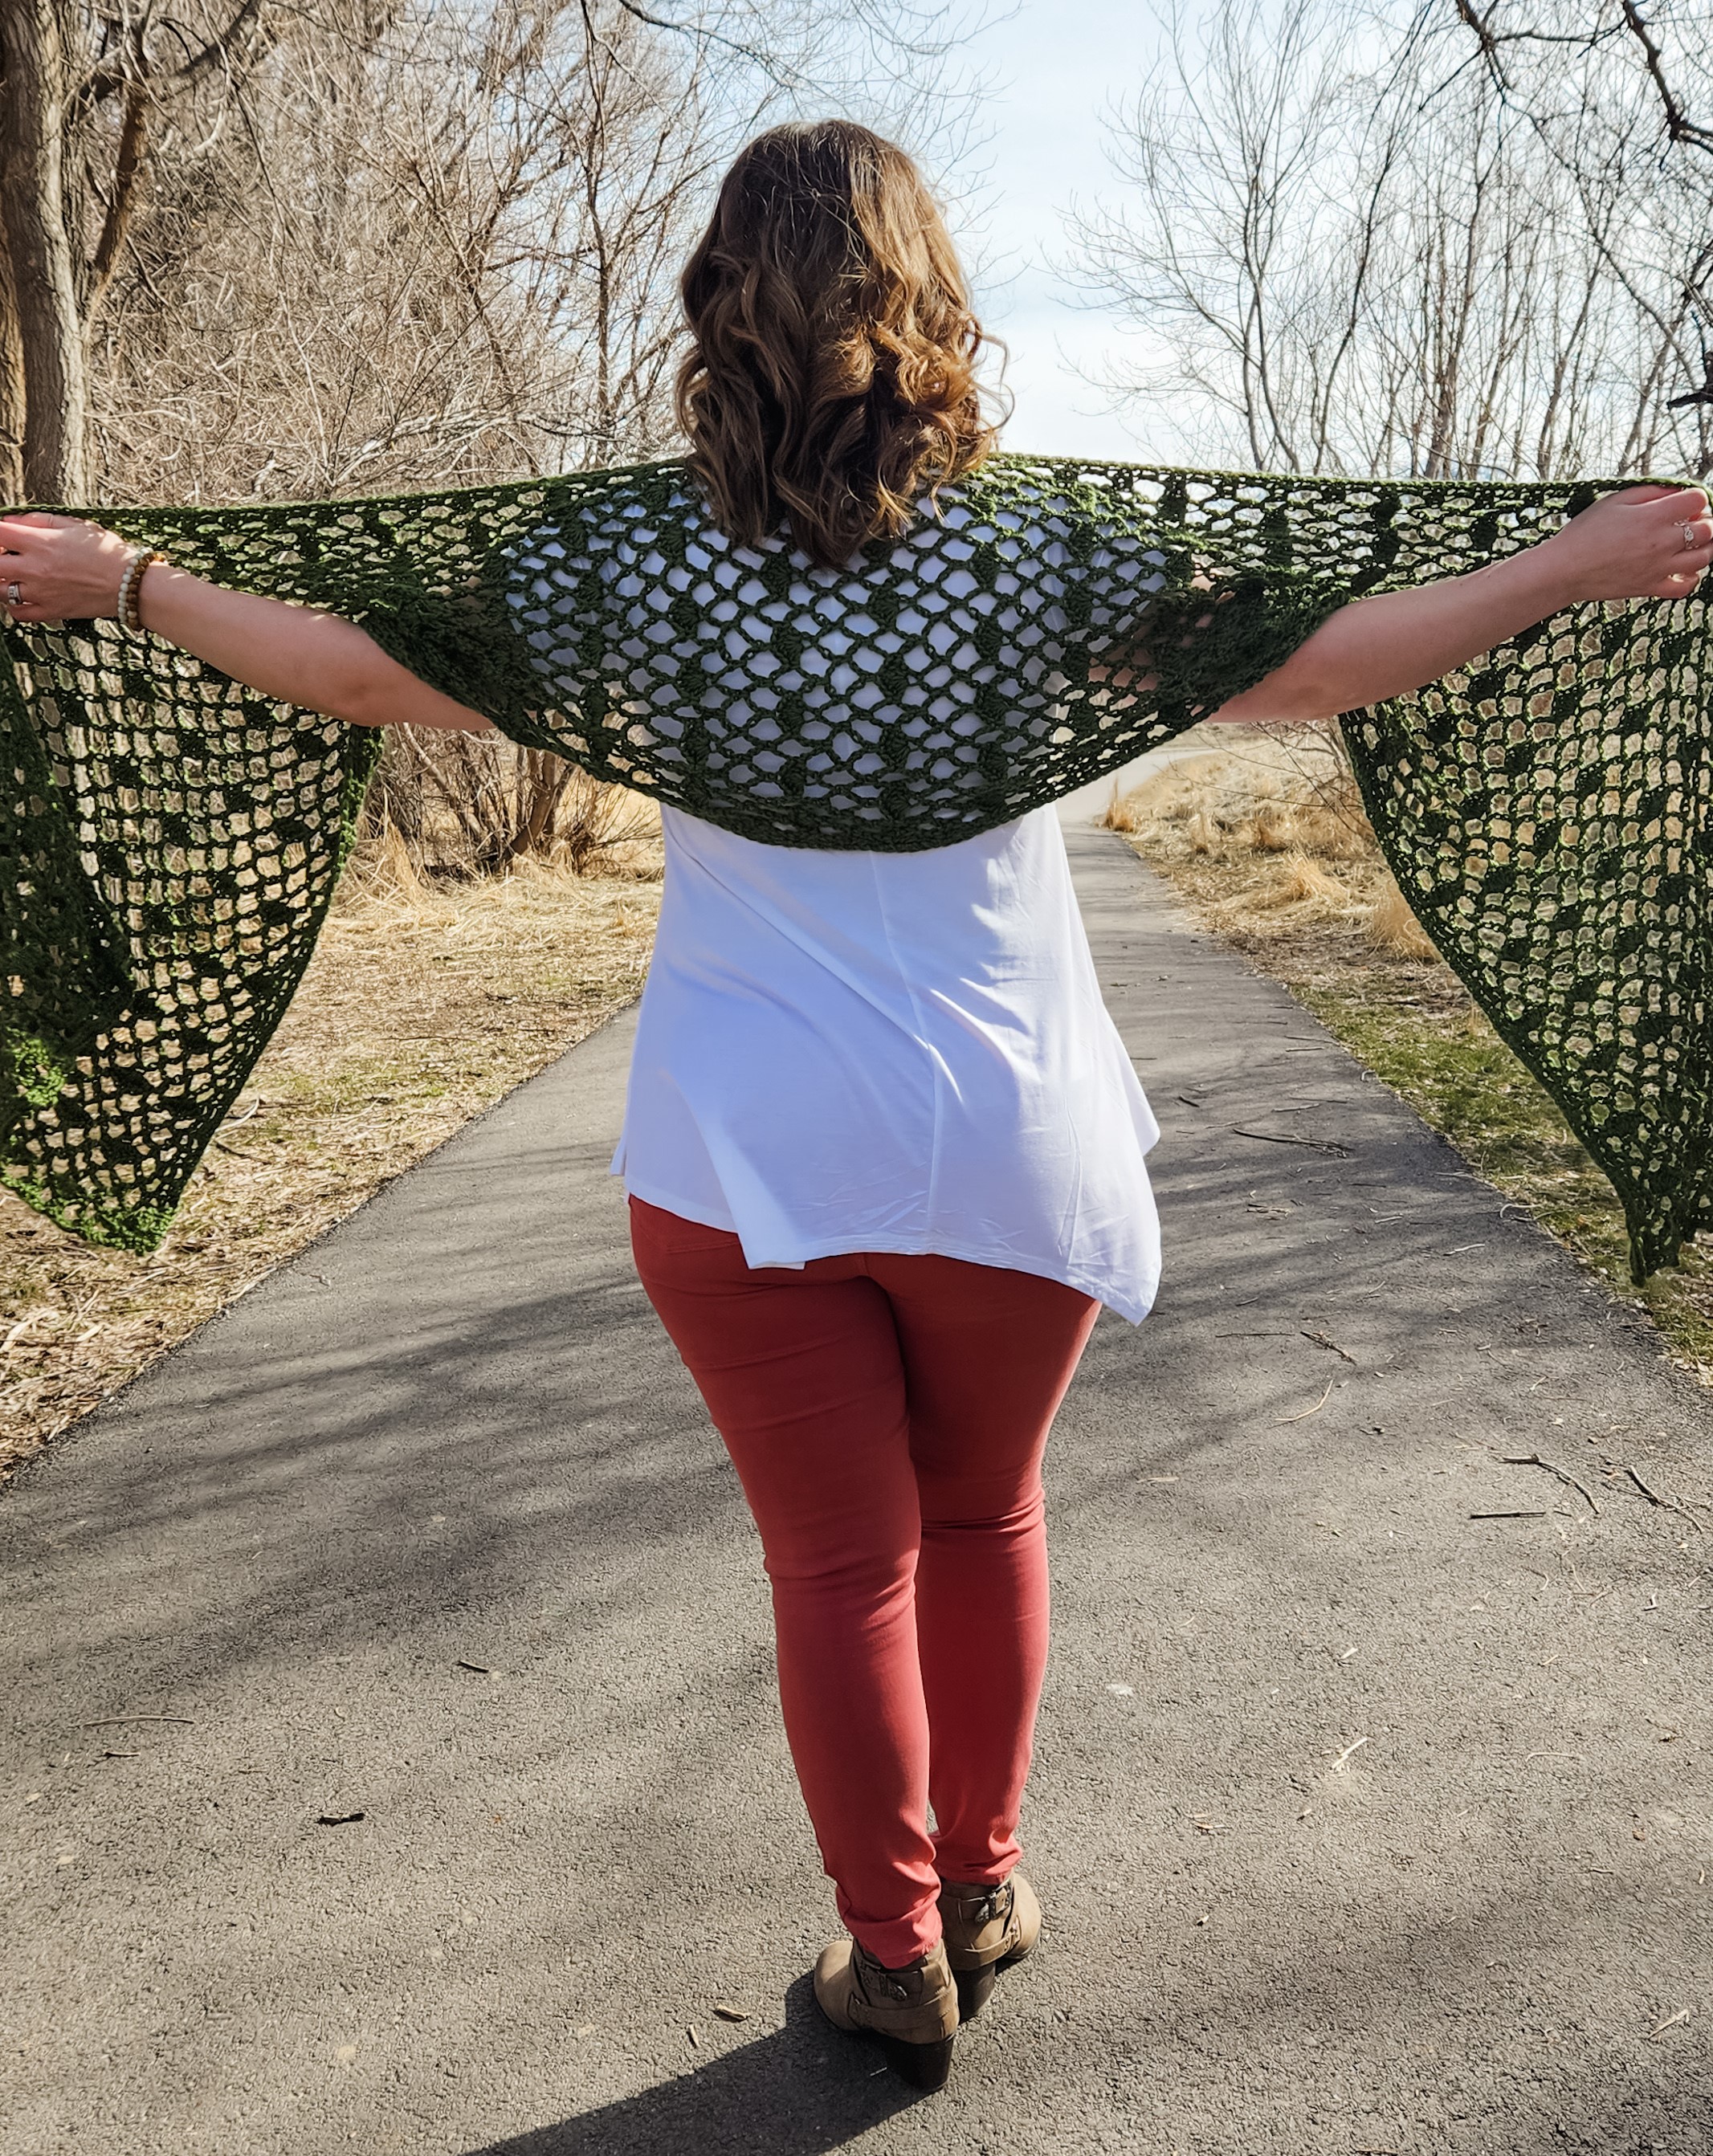
 I am excited to share this new design for the blog hop hosted by Crochet Foundry Magazine. I wanted to design a wrap for the spring season, and I am very happy with how it turned out. The lacy design works up quickly, which is great if you want an extra long wrap like I made. It is a versatile design. I wore the wrap as a shawl, a scarf, and I also wrapped it around as a cowl/shawl combo.

Post contains affiliate links. See full affiliate disclosure here.

Photo Credit: K. Gross (my 10 year old son)


Furls Crochet supplied the materials for this design, and I was immediately drawn to this gorgeous meadow green color. You can see that we're still waiting for spring to fully bloom, so the green yarn was definitely needed.


Materials:

Wander Yarn - 5 skeins (approximately 600 yds) Worsted Weight #4

K Hook (6.5mm) - I used the Jupiter Streamline

Scissors

Needle for weaving in ends


Abbreviations:

Ch - Chain

Sp - Space

St(s) - Stitch(es)

Sl st - Slip Stitch

Sc - Single Crochet

Dc - Double Crochet

Shell St - 5 dc in same st

Picot - Ch 3, sl st in first ch made

Photo Credit: K. Gross

Instructions:

Ch 70

1. Sc in 2nd ch from hook, and each remaining ch. 69 sts

2. TURN, ch 3 (or standing dc). Dc in next st. *Sk 2 sts, 5dc in next st. Sk 2 sts, sc in next st. Ch 5, sk 3 sts, sc in next st.* Repeat to last 7 sts. Sk 2 sts. 5dc in next st. Sk 2 sts. Dc in last 2 sts.

3. TURN, ch 3 (or standing dc). Dc in next st. Ch 3, sc in 3rd dc of shell st. *Ch 5, sc in ch 5 sp.* Repeat across. Ch 3, dc in last 2 sts.

4. TURN, ch 3 (or standing dc). Dc in next st. Ch 1, sc in ch 3 sp. *Ch 5, sc in ch 5 sp.* Repeat across. Ch 5, sc in ch 3 sp. Ch 1, dc in last 2 sts.

5. TURN, ch 3 (or standing dc). Dc in next st. Ch 3, sc in ch 5 sp. *Ch 5, sc in ch 5 sp.* Repeat across. Ch 3, dc in last 2 sts.

6. TURN, ch 3 (or standing dc). Dc in next st. Ch 1, sc in ch 3 sp. *Ch 5, sc in ch 5 sp. 5dc in next sc. Sc in ch 5 sp* Repeat across. Ch 5, sc in ch 3 sp. Ch 1, dc in last 2 sts.

7. TURN, ch 3 (or standing dc). Dc in next st. Ch 3, sc in ch 5 sp. *Ch 5, sc in 3rd dc of shell st. Ch 5, sc in ch 5 sp.* Repeat across. Ch 3, dc in last 2 sts.

8. TURN, ch 3 (or standing dc). Dc in next st. Ch 1, sc in ch 3 sp. *Ch 5, sc in ch 5 sp.* Repeat across. Ch 5, sc in ch 3 sp. Ch 1, dc in last 2 sts.

9. TURN, ch 3 (or standing dc). Dc in next st. Ch 3, sc in ch 5 sp. *Ch 5, sc in ch 5 sp.* Repeat across. Ch 3, dc in last 2 sts.

10. TURN, ch 3 (or standing dc). Dc in next st. Ch 1, sc in ch 3 sp. *5dc in next sc, sc in ch 5 sp. Ch 5, sc in ch 5 sp.* Repeat across. Sc in ch 3 sp. Ch 1, dc in last 2 sts.

Photo Credit: K. Gross

Repeat rows 3-10 (make sure you end with either a row 6 or row 10) until wrap measures desired length. I made mine extra long so I could wrap it around to make a cowl too.

Finishing

TURN, ch 1. Sc in first 2 sts. Ch 2, sc in 3rd st of shell st. *Ch 4, sc in ch 5 sp, ch 4, sc in 3rd st of shell st.* Repeat across. Ch 2, sc in last 2 sts. (69 sts)

TURN, ch 1. Sc in each st and ch across. (69 sts)

TURN, ch 1. Sc in first st, picot, sc in next 3 sts. *picot, sc in next 5 sts.* Repeat across. Sc in next 4 sts, picot, sc in last st.

DO NOT TURN 

Continue working along the side of your wrap. Sc evenly across. I put 2 sc per row.

When you get to the other end, work sc and picots just like row 3.

Continue working along the other side of your wrap. Sc evenly across. Join to first sc of finishing row 3, cut yarn and weave in ends.


I would love to see your wraps! Tag me on Instagram @craftsbysarahliz so I can see your work. #persephonewrap

*Permissions*

- You are free to sell what you make from this pattern. I would appreciate links back to my blog, Ravelry, or Etsy shop to credit me as the designer.

- You may not use my photos.

- You may not sell this pattern, or any part of this pattern, distribute it, or claim it as your own.


© 2023 Sarah Gross - Crafts by Sarah Liz
Photo Credit: K. Gross

Wednesday, March 22, 2023

Classic Kitchen Mug Rug and Trivet Knitting Patterns - Free Patterns

 If you're looking for quick and easy patterns for your craft shows, or a gift basket, these two patterns are just the thing. These are beginner friendly, and work up quickly. They're one of my favorite patterns to work on while watching TV. Scroll down for the patterns and helpful links to get you started.


Materials: (may contain affiliate links, view affiliate disclosure here)

Bernat Maker Home Dec Yarn - 2 skeins (yarn is held doubled)

Size 11 needles

Row Counter

Scissors

Needle for weaving in ends

Suede cord - Optional


Abbreviations:

K - Knit

Sl - Slip

St(s) - Stitch (Stitches)


Notes:

These patterns are knit flat.

Slip stitches purlwise, with yarn held in back.

Use the Long Tail Cast on Method. Tutorial Link

CLASSIC KITCHEN MUG RUG PATTERN

Cast on 12 sts

1. Sl first st. K to end. 12 total sts

Repeat row 1 until you have 24 rows.

Bind off, cut yarn and weave in ends.

Cut 12 strands of yarn, and loop 3 strands around each corner to make the tassel.


CLASSIC KITCHEN TRIVET PATTERN

Cast on 22 sts

1. Sl first st. K to end. 22 total sts

Repeat row 1 until you have 44 rows.

Bind off, cut yarn and weave in ends.

Cut a strand of suede cord, approximately 8 inches. Loop around one corner, and knot the end.


I would love to see your mug rugs and trivets! Tag me on Instagram @craftsbysarahliz so I can see your work! #classickitchenmugrug #classickitchentrivet 


*Permissions*

- You are free to sell what you make from this pattern. I would appreciate links back to my blog, Ravelry, or Etsy shop to credit me as the designer.

- You may not use my photos.

- You may not sell this pattern, distribute it, or claim it as your own.

© 2023 Sarah Gross - Crafts by Sarah Liz


Friday, January 6, 2023

Oceana Hot Cup Cozy - Free Pattern

 This past fall, I made some hot cup cozies for my craft shows using the same stitch pattern as my Oceana Iced Cup Cozy pattern. I loved how quickly they worked up, so I'm sharing the pattern with you so you can make it to! Keep scrolling for the pattern below.


Materials

H hook (5mm)

Worsted Weight Yarn (I used I Love This Yarn)

Scissors and needle

Tag or Feltie - Optional


Instructions

Ch 30, join with sl st to work in round 

1. Hdc in back bump of each ch around. Join with sl st. There will be 30 sts at the end of each round.

2. Ch 1, hdc3rdloop in each st around. Join with sl st.

3. Repeat round 2

4. Ch 1, (sc, 2dc) in first st. *Sk 2 sts, (sc, 2dc) in next st.* Repeat around, sk last 2 sts. Join with sl st to first sc to join.

5. Ch 1, hdc in each st around. Join. 

6. Repeat round 4

7. Repeat round 5

8. Repeat round 4

9. Repeat round 5

10. Ch 1, hdc3rdloop in each st around. Join with sl st.

11. Repeat round 10


Cut yarn, weave in ends. Add a tag or feltie if desired.


I would love to see your Oceana Cup Cozies! Tag me on Instagram @craftsbysarahliz so I can see your work


*Permissions*

- You are free to sell what you make from this pattern. I would appreciate links back to my blog, Ravelry, or Etsy shop to credit me as the designer.

- You may not use my photos.

- You may not sell this pattern, or any part of this pattern, distribute it, or claim it as your own.


© 2023 Sarah Gross - Crafts by Sarah Liz


Friday, July 1, 2022

Oceana Iced Coffee Cup Cozy - Free Pattern

 I wanted to make an Iced Coffee Cup Cozy that worked up quickly, but still had some texture from the stitches. So I designed the Oceana Cup Cozy! This stitch pattern gives me some beach vibes, so I made some cozies with some fun beach felties too. Add your favorite tags or felties, and you have a quick project that's perfect for summer markets.


Materials

H hook (5mm)

Worsted Weight Yarn (I used I Love This Yarn)

Scissors and needle

Tag or Feltie - Optional

Instructions

Make magic ring 

1. Ch 1, 10 hdc in magic circle. Join with sl st to first hdc. 10 sts

2. Ch 1, 2hdc in first and in each st around. Join.  20 sts

3. Ch 1, hdc in first st, 2hdc in next. Rpt around. Join. 30 sts

4. Ch 1, hdc in each st around. Join. 30 sts

5. Ch 1, (sc, 2dc) in first st. *Sk next 2 sts. In next st (sc, 2dc).* Repeat * * around, sk last 2 sts, and join with st st to first sc. 


6.-15. Repeat rounds 4 and 5.


16. Ch 1, hdc in each st around. 

17. Ch 1, hdc3rdloop in each st around. 

18. Rpt round 17.

Cut yarn, weave in ends. Add tag or feltie if desired. Slip onto your iced drink, and you are good to go!

I would love to see your Oceana Cup Cozies! Tag me on Instagram @craftsbysarahliz so I can see your work


*Permissions*

- You are free to sell what you make from this pattern. I would appreciate links back to my blog, Ravelry, or Etsy shop to credit me as the designer.

- You may not use my photos.

- You may not sell this pattern, or any part of this pattern, distribute it, or claim it as your own.


© 2022 Sarah Gross - Crafts by Sarah Liz

Wednesday, June 1, 2022

Lip Balm Holder - Free Pattern


These lip balm holders are one of my most practical items that I make. I created this pattern as a quick make for party favors for an event. But then I started making them for markets and craft shows, and they were so popular! Everyone knows someone who is always loosing their lip balm. I used a soft cotton yarn, and a swivel keychain to quickly add the holder to your purse or backpack. Check out the pattern below so you can make some too!

Materials
E hook 3.5mm (I crochet tightly, so you may need to size up if it doesn't fit your lip balm)
I Love This Cotton Yarn (or similar worsted weight)
Inserts - I ordered these from The Knotty Boss on Etsy.

Make magic ring 
1. 8 hdc in magic ring, sl st to first hdc to join. 8 sts
2. Ch 1, hdc blo in each st around. Join. 8 sts
3. Ch 1, hdc in each st around. Join. 8 sts
4. Rpt round 3
5. Rpt round 3
6. Rpt round 3
7. Rpt round 3
8. Ch 1, sc in each st around. Join
9. Ch 1, sc in first and next st.
10. Ch 1, TURN, sc in first and next st. 
11. Rpt round 10
12. Rpt round 10


Fold flap through swivel ring or key ring, and sew to secure.


I would love to see your lip balm holders! Tag me on Instagram @craftsbysarahliz so I can see your work


*Permissions*

- You are free to sell what you make from this pattern. I would appreciate links back to my blog, Ravelry, or Etsy shop to credit me as the designer.

- You may not use my photos.

- You may not sell this pattern, or any part of this pattern, distribute it, or claim it as your own.


© 2022 Sarah Gross - Crafts by Sarah Liz

Sunday, January 30, 2022

Wanderlust Cowl

 I am so excited to be the designer featured in this week's blog hop hosted by Crochet Foundry Magazine. There is still a lot of snow on the ground for us in January, so cozy accessories are a must. Textured stitches add to the cozy factor, and using multiple colors adds some interest to the unique design. 

Post contains affiliate links. See full affiliate disclosure here.

Furls Crochet provided the materials for this pattern, and I was drawn to these cool colors from their Wander Yarn collection. In this design, each row uses a different color, so the color combination options are endless. You can easily change up the look of this cowl based on your color choices. 


Materials:

Size J (6 mm) hook Furls Odyssey Hook

Worsted Weight Yarn #4 (Furls Wander Yarn) in 3 colors

A - Mist, B - Cobblestone, C - Peninsula

Color A – Approximately 86 yds

Color B – Approximately 42 yds

Color C – Approximately 52 yds

Scissors

Needle for weaving in ends

Tape Measure – For checking gauge


Gauge:

13 sts, HDC = 4 inches  

Check your gauge and adjust hook size accordingly. 


Abbreviations (US terms):

CH – Chain

Sl St – Slip Stitch

SK - Skip

HDC – Half Double Crochet

FHDC – Foundation Half Double Crochet (see tutorials)

DC – Double Crochet

HDC3rdloop – HDC in 3rd loop (see special stitches)

Puff V st – Puff V Stitch (see special stitches)

St(s) – Stitch(es)

RS – Right Side

WS – Wrong Side

Notes:

• Worked in the round

• Do NOT cut yarn when switching colors. Carry yarn up WS of work 

• Repeat sections will be noted with *  *

• Color A – Mist, Color B – Cobblestone, Color C - Peninsula


Special Stitches:

Puff st: 

Yarn over, insert hook and draw up a loop (3 loops on hook)

Yarn over, insert hook and draw up a loop (5 loops on hook)

Yarn over, insert hook and draw up a loop (7 loops on hook)

Yarn over, insert hook and draw up a loop (9 loops on hook)

Yarn over, and draw through 7 loops on hook.

Yarn over, and draw through remaining 2 loops on hook. (do NOT ch 1 after)


Puff V st:

Complete 1 puff st as seen in instructions above, ch 1, repeat puff st instructions in same stitch indicated.


Hdc3rdloop:

With RS facing you, locate loop in the back of your work (not the top 2 loops that are usually worked).


Tutorials:

How to Check Gauge: https://www.pinterest.com/pin/459085755770169349/ 

FHDC: https://www.pinterest.com/pin/459085755770169403/


Instructions:

1. With color A. FHDC 80, sl st to first FHDC to join.


2. Color B. Ch 1, Hdc3rdloop in each st around. Join. 80 sts


3. Color C. Ch 1, Hdc3rdloop in each st around. Join. 80 sts


4. Color A. Ch 1, Hdc3rdloop in each st around. Join.  80 sts


5. Color B. Ch 1, HDC in first st. *Ch 1, sk 1 st, HDC in next st.* Repeat around. Ch 1, sk last st. Join.  80 sts (40 hdc, 40 ch sp)


6. Color A. Ch 1, HDC in each st and ch sp around. 80 sts


7. Color C. Ch 1, HDC in first st *sk 1 st, puff v st in next st. Sk 1 st, HDC in the next st.* Repeat around to last 3 sts. Sk 1 st, puff v st in next st. Sk last st, join.  (20 puff v sts, 20 hdc)


8. Color A. Ch 1, hdc in first st. *3HDC in puff v st sp. HDC in next HDC st.* Repeat around. 3HDC in last puff v st sp. Join. 80 sts


9. Color B. Repeat round 5.


10. Color A. Repeat round 6.


11. Color C. Ch 1, HDC in each st around.  80 sts


12. Color A. Ch 1, Hdc3rdloop in each st around.  80 sts


13. Color B. Repeat round 7.


14. Color A. Repeat round 8. 


15. Color C. Ch 1, HDC in each st around.  80 sts


16. Color A. Ch 1, Hdc3rdloop in each st around.  80 sts


17. Color B. Repeat round 5.


18. Color A. Repeat round 6.


19. Color C. Repeat round 7.


20. Color A. Repeat round 8.


21. Color B. Repeat round 5.


22. Color A. Repeat round 6. 


23. Color C. Ch 1, HDC in each st around.  80 sts


24. Color B. Ch 1, Hdc3rdloop in each st around.  80 sts


25. Color A. Ch 1, Hdc3rdloop in each st around.  80 sts


26. Color A. Ch 1, Hdc3rdloop in each st around. 80 sts


Cut yarn, weave in ends. 


I would love to see your cowls! Tag me on Instagram @craftsbysarahliz so I can see your work

#wanderlustcowl

*Permissions*

- You are free to sell what you make from this pattern. I would appreciate links back to my blog, Ravelry, or Etsy shop to credit me as the designer.

- You may not use my photos.

- You may not sell this pattern, or any part of this pattern, distribute it, or claim it as your own.


© 2022 Sarah Gross - Crafts by Sarah Liz