Monday, May 22, 2017

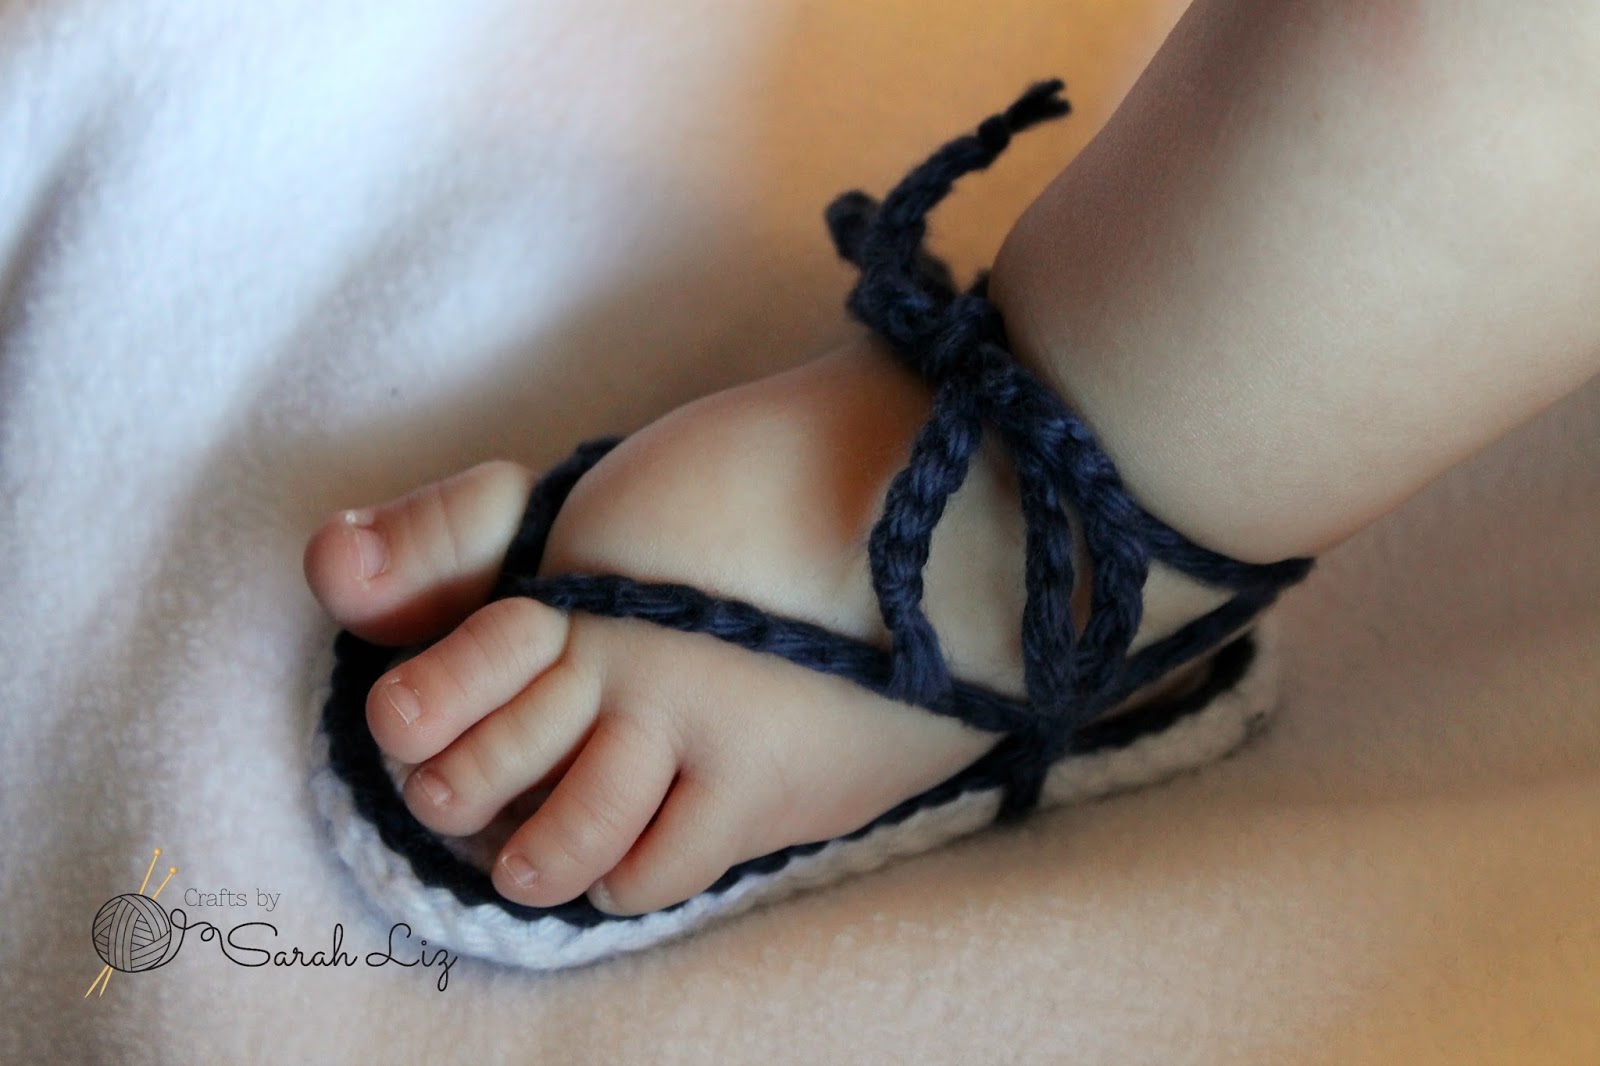
Baby Flip Flops - Crochet Pattern


Is there anything cuter than baby toes? I could just eat them up. My favorite season is summer because those sweet baby toes aren't covered up by the socks or booties that they wear in the winter. A lot of the cute sandals and flip flops wouldn't stay on my baby girl's feet so I designed my own. These feature ankle ties to help keep them on your baby's feet. And the little ties look so cute around their ankles!

Here are some of the details you will find in the pattern that is available to purchase on my Etsy shop HERE or Ravelry shop HERE:


Size:
Use hook size to adjust the pattern for multiple sizes. Based on the tightness of my tension, here is what I use:
E hook (3.5mm): 3 Months, sole is approximately 3.5 inches
F hook (3.75mm): 6 Months, sole is approximately 4 inches
G hook (4mm): 9 Months, sole is approximately 4.5 inches

Materials:
Use hook based on sizes above. Adjust hook size if your tension creates a larger or smaller sole than my gauge.
Worsted Weight Yarn (I like Caron Simply Soft or Hobby Lobby I Love This Cotton Yarn) in 2 colors.
Large eye needle for weaving in ends

Notes:
The sole is worked in a continuous spiral. DO NOT join at the end of each round.
Instructions are in US terms.


*Permissions*
- You are free to sell what you make from this pattern. I would appreciate links back to my blog to credit me as the designer.
- You may not use my photos
- You may not sell this pattern or claim it as your own

Happy crocheting!
-Sarah Liz

Tuesday, May 16, 2017

Easy Cheaty Stroganoff

I have three children 4 years old and younger. To say that I am busy is an understatement. On top of the normal crazy that three young children bring, I also run my Etsy business. Naturally, I do not have a lot of time to cook for my family. So a lot of my personal recipes are cheater recipes. I take pre-made things like a jar of spaghetti sauce, and "doctor" it up to make my dish. One of my husband's favorites is my stroganoff cheat that I am going to share with you.

-Ingredients
1 lb Ground Beef 
Half of an Onion
Sliced Mushrooms (I looooove mushrooms so I always put a lot in mine, but you can adjust it to your taste)
Splash of Worcestershire Sauce
Splash of Red Wine Vinegar
1 tsp Thyme
McCormick Stroganoff Season Packet
Beef Broth
4-8 oz Sour Cream 
-Directions
In saucepan over medium heat, saute ground beef, onion, and mushrooms until beef is browned and veggies are soft.
Add splash of Worcestershire sauce and red wine vinegar. Add thyme. Cook for an additional three minutes.
Add season packet and half a can of beef broth. Lower heat and simmer for a few minutes. Remove from heat and add 4-8 oz sour cream to taste.
Add a little bit of broth or water to get the consistency you want.
Serve over rice or noodles.

What "cheats" do you use in your cooking? I would love to hear about your shortcuts.

Happy Cooking!
-Sarah Liz

Monday, May 8, 2017

Lacy Baby Headband - Free Knitting Pattern


I first opened up my Etsy shop with some baby headbands and booties. The headbands were a little knitting pattern I developed in my own head. I feel like it is time to write it down and share it with you. See pattern below, or you can download a pdf version on my Ravelry store HERE.

-Materials
Size 3 knitting needles
Worsted Weight yarn (I used Caron Simply Soft)
Scissors
Needle for weaving in ends

-Abbreviations
CO - cast on
RS - right side
WS - wrong side
K - knit
P - purl
YO -yarn over
K2TOG - knit 2 together
BO - bind off

-Gauge
20 sts, 44 rows, garter stitch = 4"

-Sizes
Instructions are for 0-3 months with (3-6 months, 6-9 months) in parenthesis.

-Pattern
Using thumb method, CO 72 (80, 88) sts.
Row 1. WS - Knit across
Row 2. RS - Knit across
Row 3. WS - K 2 sts, *yo, k2tog*. Repeat * * until 2 sts from the end. K 2 sts.
Row 4. RS - Knit across
Row 5. WS - K 1 st, *yo, k2tog*. Repeat * * until 1 st from the end. K 1 st.
Row 6. RS - Knit across
Row 7. WS - K 2 sts, *yo, k2tog*. Repeat * * until 2 sts from the end. K 2 sts.
Row 8. RS - Knit across
Row 9. WS - Knit across
Row 10. RS - BO using a loose bind off or you can use the alternate bind off below
Alternate Bind Off - Elizabeth Zimmermann's sewn bind off HERE.

-Finishing
Using needle, sew ends together. Attach your favorite flower or bow at the seam to help hide where you sewed it together. See below for my favorite flower pattern to go with this headband.

-Crochet Flower Pattern
I modified a version of this pattern HERE

Using G hook (4mm)
Ch 4 (Magic circle does not work with this flower pattern)
Sl st in 1st chain to form a circle
Prep: Ch 1
Round 1. *Ch 3, sc in circle* Repeat 3 more times (you will have 4 loops at this point). Ch 3, sl st into Ch 1 in prep round (now you have 5 loops)
Round 2. In first ch 3 loop, (sc, ch 1, 3dc, ch 1, sc). Repeat in the rest of the loops. Join to the first sc of the first petal.
Round 3. Fold the petals toward yourself so you can work behind them to make the next layer of the flower. Still working in the circle made from the ch 4 at the beginning, *sc, ch 4*. Repeat 3 more times (you will have 4 loops at this point). Ch 4, sl st to first sc. (now you have 5 loops)
Round 4. In the first ch 4 loop, (sc, hdc, dc, 3 tr, dc, hdc, sc). Repeat in each ch 4 loop around. Join with sl st to the first sc of the first petal of the round. Cut yarn leaving a long tail for sewing to headband.

-Finishing
Sew a pretty button in the center of your flower. Sew the flower to the headband, weaving in any remaining ends.

I would love to see your headbands! Tag me on instagram @craftsbysarahliz so I can see your work!


*Permissions*
- You are free to sell what you make from this pattern. I would appreciate links back to my blog to credit me as the designer.
- You may not use my photos
- You may not sell this pattern or claim it as your own

© Sarah Gross - Crafts by Sarah Liz
Tuesday, May 2, 2017

The Face Behind the Posts

It is now the month of May. As it is my birthday month, I thought I would share a bit of a personal post with you so you can see that there is indeed a person behind these posts.

A little bit about me:

 I am a nerd. Here are some shocking nerdy confessions: I grew up watching Star Trek: The Next Generation. Yes, I am a Trekkie. That upbringing brought about a love for all things nerdy from Star Wars, to Harry Potter, to The Lord of the Rings, I love it all. I have even played Dungeons and Dragons. Eek! I can't believe I just admitted that! Alright, moving on. Before 2015 I worked as an administrative assistant for a franchise of Taco Bell. So every once in a while I get an insane craving for it. Cheesy Gordita Crunches, to be exact. When I'm not having a fast food craving, I love to cook. I learned how to cook from my mom. My favorites are soups. But as often as I try, my soups never turn out as good as my mom's.

A little bit about my family:

I have been married to my awesome, encouraging, and loving husband for eight years now. We have three beautiful children. Our son is the oldest. He is now 4 1/2 years old. He is growing up so much this year. He is such a big help to me with his little sisters. He also loves helping me in the kitchen, and with my chores. Our middle child is a little firecracker. She is now 2 and is the funniest little person I know. Her comedic timing is already fantastic. Her favorite things are books and her baby sister. My favorite thing right now is when she comes up to me and asks for "nuggles". Our youngest is 6 months now. She is a little redhead with the brightest blue eyes you have ever seen. She loves squealing at her big brother and sister and rolling and crawling around.

A little bit about my business:

I was taught the basic knitting stitch in 2010. I expanded on that, and in 2012 I taught myself how to crochet. I am a yarn addict, and just a little bit of a yarn hoarder. That addiction led me to open my Etsy shop in 2013. I have learned so much in the years since opening shop. I still have a lot to learn, and I don't think I will ever stop developing my shop. I look back at where I started and I am amazed at how it has progressed. I look forward to reminiscing again in a few years to see how far my shop has come.

A little note to you:

I am not in this business by myself. I have the most amazing support system around me. That support system includes you wonderful people. You who have ordered products from my shop. You who have read and shared my posts. You who have tried my patterns or recipes. None of my success could be done without your support. Thank you, from the bottom of my heart.

-Sarah Liz

Thursday, April 27, 2017

Daisy Baby Bib - Free Crochet Pattern

When my drool monster, er, I mean, when my sweet precious baby started teething, inspiration struck for this drool bib pattern. It turned out so pretty that I just have to share it with you.

-Materials
Cotton yarn (I used Lily Sugar and Cream Cotton in Yellow, White, and Country Green)
G hook (4mm)
Needle for weaving in ends
Scissors

-Gauge
My hook size and tension make the bib about 6 inches wide and 5 inches tall (not including the ties). I do have a tight tension so you may want to adjust your hook size.

-Abbreviations
Ch - Chain
Sc - Single Crochet
Sc decrease - Single Crochet Decrease
Sl st - Slip Stitch
RS - Right Side
WS - Wrong Side
St(s) - Stitch(es)


For a free PDF version of this pattern, visit my Ravelry listing HERE.

-Pattern
Ch 15
1. Sc in 2nd chain from hook, and in the next 13 ch. (14 sts)
2. Ch 1, turn, 2sc, sc in next 12, 2sc
3. Ch 1, turn, 2sc, sc in next 14, 2sc
4. Ch 1, turn, 2sc, sc in next 16, 2sc
5. Ch 1, turn, 2sc, sc in next 18, 2sc
6. Ch 1, turn, 2sc, sc in next 20, 2sc
7-14. Ch 1, turn, sc across
15. Ch 1, turn, sc decrease, sc in next 20, sc decrease
16. Ch 1, turn, sc decrease, sc in next 18, sc decrease
17. Ch 1, turn, sc decrease, sc in next 16, sc decrease
18. Ch 1, turn, sc decrease, sc in next 14, sc decrease

Now working on the shoulders
1. Ch 1, turn, sc decrease, sc, sc decrease, leave remaining stitches, chain 1, turn.
2. Ch 1, turn, sc decrease, sc
3. Ch 1, turn, sc decrease

Other shoulder, sl st in 5th st from the end,
1. Ch 1, sc decrease, sc, sc decrease
2. Ch 1, turn, sc, sc decrease
3. Ch 1, turn, sc decrease

Border
With the RS facing, start at the neck of the bib. Sc along the edge and up the edge of the shoulder. When you get to the top of the shoulder, ch 45, sl st back down, making one of the ties.Sc 3 more sts along the outside of the bib. Now start your shell pattern around the sides and bottom of the bib.

*Shell Pattern*
(Sc, dc, sc) in stitch, sl st in next 2 sts

Continue shell pattern until you reach the beginning of the shoulder on the other side of the bib. Sc along the edge of the shoulder. When you get to the top of the shoulder, ch 45, sl st back down, making the second tie. Continue to sc along the edge until you get back to where you started. Join to first sc. Cut off yarn and weave in remaining ends.

Daisy and Leaf Patterns

-Flower
Magic circle, sc 6 sts in the circle, pull tight and join.
Ch 1, 3dc in same st as join, ch 1, sl st in same st. 1 petal made
*Sl st into next st, ch 1, 3dc in same st, ch 1, sl st in same st.*
Repeat * * until you have 6 petals. Cut yarn leaving a long tail.

-Leaf (make 2)
Ch 6
Sc in 2nd ch from hook. Hdc in next, dc in next, hdc in next, sc in last. Cut yarn leaving a long tail to stitch leaf onto flower. Repeat for 2nd leaf.

Finishing
Stitch both leaves onto the back of the daisy. Use the yarn tail on the daisy to sew the whole flower to the bib.

I would love to see your bibs! Tag me on instagram @craftsbysarahliz so I can see your work!


*Permissions*
- You are free to sell what you make from this pattern. I would appreciate links back to my blog to credit me as the designer.
- You may not use my photos
- You may not sell this pattern or claim it as your own

© Sarah Gross - Crafts by Sarah Liz

Thursday, April 13, 2017

Breakfast Hash Recipe

Some of my favorite recipes have happened as a result of poor planning. I had a fridge semi-stocked, but not a whole lot of meat to work with. At least, not thawed meat. Most of it was in my freezer, and I had yet again forgotten to take something out to thaw for that evening. So, what did I do? Breakfast for dinner of course! This recipe is great because you only dirty one frying pan! Hooray for fewer dishes to wash!


We begin with bacon. I am going to warn you ahead of time, I start a lot of my recipes with bacon. In the words of my father, "Bacon don't need no reason". I will probably needlepoint those words on a pillow some time in my life. But that is a project for another day. Back to the recipe.

Get those bacon slices crackling in the pan. I had the thick cut bacon on hand so I only used a couple of slices. Besides, it's the bacon grease you want. Once the bacon is cooked up, remove the slices to let them cool. You can chop them up for bacon bits to add at the end.


Add your cubed potatoes to the bacon grease. Add a little salt and pepper, and fry until golden brown. Remove the taters from the pan.


Add a swirl of olive oil (about a tablespoon) to the pan. Add your diced onion and bell pepper and a little salt and pepper to taste. Saute those veggies until they get nice and soft.


Add your sliced green onions and some minced garlic. While your green onions and garlic get cozy with the onions and peppers, time to get those eggs ready.


This is my son's favorite part. Crack those eggs into a bowl. Add some milk and salt and pepper. Get a fork, and scramble them up.


Add the eggs to the veggies and stir while cooking them to a delicious scramble.


When your eggs are ALMOST done, add those taters back in to heat through.


Add some cheese and those bacon bits from earlier, and voila! Breakfast for Dinner!


This is how our dinner turned out. K had to have his airplane be a part of the photo. He got blueberries with his dinner. You can also add your favorite salsa or hot sauce for an extra little kick. The hubby likes sriracha on his hash.

You can switch up the veggies, or add some sausage too! I would love to hear how your Breakfast for Dinner turns out!

Happy Cooking!
-Sarah Liz

*******************************************
Recipe
*******************************************
-Ingredients


2 slices of bacon
1 large potato diced into cubes
Olive Oil
1 bell pepper, diced
1 onion, diced
1 bunch green onions, sliced
2 cloves garlic, minced
7 eggs
1 Tbsp milk
Salt and Pepper to taste
Shredded Cheese


-Instructions

In a large skillet over medium heat, cook bacon slices. Once they are cooked, remove bacon slices. Add your cubed potatoes to the bacon grease. Add a little salt and pepper, and fry until golden brown. Remove the potatoes from the pan. Add a swirl of olive oil (about a tablespoon) to the pan. Add your diced onion and bell pepper and a little salt and pepper to taste. Saute until they get nice and soft. Add your sliced green onions and minced garlic to the pan.

In medium sized bowl, combine eggs, milk, and salt and pepper. Add to veggie mixture in pan. When scramble is almost done cooking, add potatoes to the pan. Cook until potatoes are heated through. Chop up the bacon from earlier, and put it on top of the hash along with some shredded cheese.

Tuesday, April 11, 2017

Little Prince Crown - Free Crochet Pattern


I was working on an order recently for a gold princess crown, and my nephew was watching me. He asked me to make a crown for him. Obviously I could not say no. The pattern for the princess crown that I was using is a little too feminine for him. So I whipped up a pattern that night. And then my son saw it, so I had to make another one. I decided I might as well write it down here to share with you.

Materials
- I hook (5.5mm)
- Worsted Weight Yarn (I used Caron Simply Soft)
- Scissors
- Needle for weaving in ends

Gauge
This pattern has different sizes based on how many multiples of 6 stitches and hook size. Your tension and yarn choice may affect these sizes. 

Sizes
0-3 Months:     4.5mm hook         54 sts
3-6 Months:     5mm hook (H)      54 sts
6-9 Months:     4.5mm hook         60 sts
9-12 Months:   5.5mm hook (I)    60 sts
Toddler:           5mm hook (H)      72 sts
Child:               5.5mm hook (I)    72 sts

Abbreviations
fsc - Foundation Single Crochet
sc - Single Crochet
sl st - Slip Stitch
dc - Double Crochet
tr - Treble Crochet
ch - Chain
ch sp - Chain Space

Special Stitches
Foundation Single Crochet - If you are not familiar with this stitch, Moogly has a great tutorial HERE


Pattern
1. Fsc 54, 60, or 72 based on sizes above, join to first fsc to create loop
2. Turn so the band is now inside out, sc across, join (do NOT turn)
3. Ch3 (counts as dc), dc in each st across, join
4. *Skip 2 sts, in next st after the 2 skipped sts (3dc, 1tr, ch1, 1tr, 3dc), skip 2 sts, sl st in next* Repeat in between * * to end, join
5. Sl st up shell to ch space, *sl st in ch sp, (ch1, dc, ch1, sl st) in ch sp. Sl st in next sts to next ch sp.* Repeat in between * * to end.
Weave in ends.


I would love to see your crowns! Tag me on instagram @craftsbysarahliz so I can see your work!

*Permissions*
- You are free to sell what you make from this pattern. I would appreciate links back to my blog to credit me as the designer.
- You may not use my photos
- You may not sell this pattern or claim it as your own

© Sarah Gross - Crafts by Sarah Liz